Over the holidays, I got to see not one but TWO ballet performances. How awesome is that!
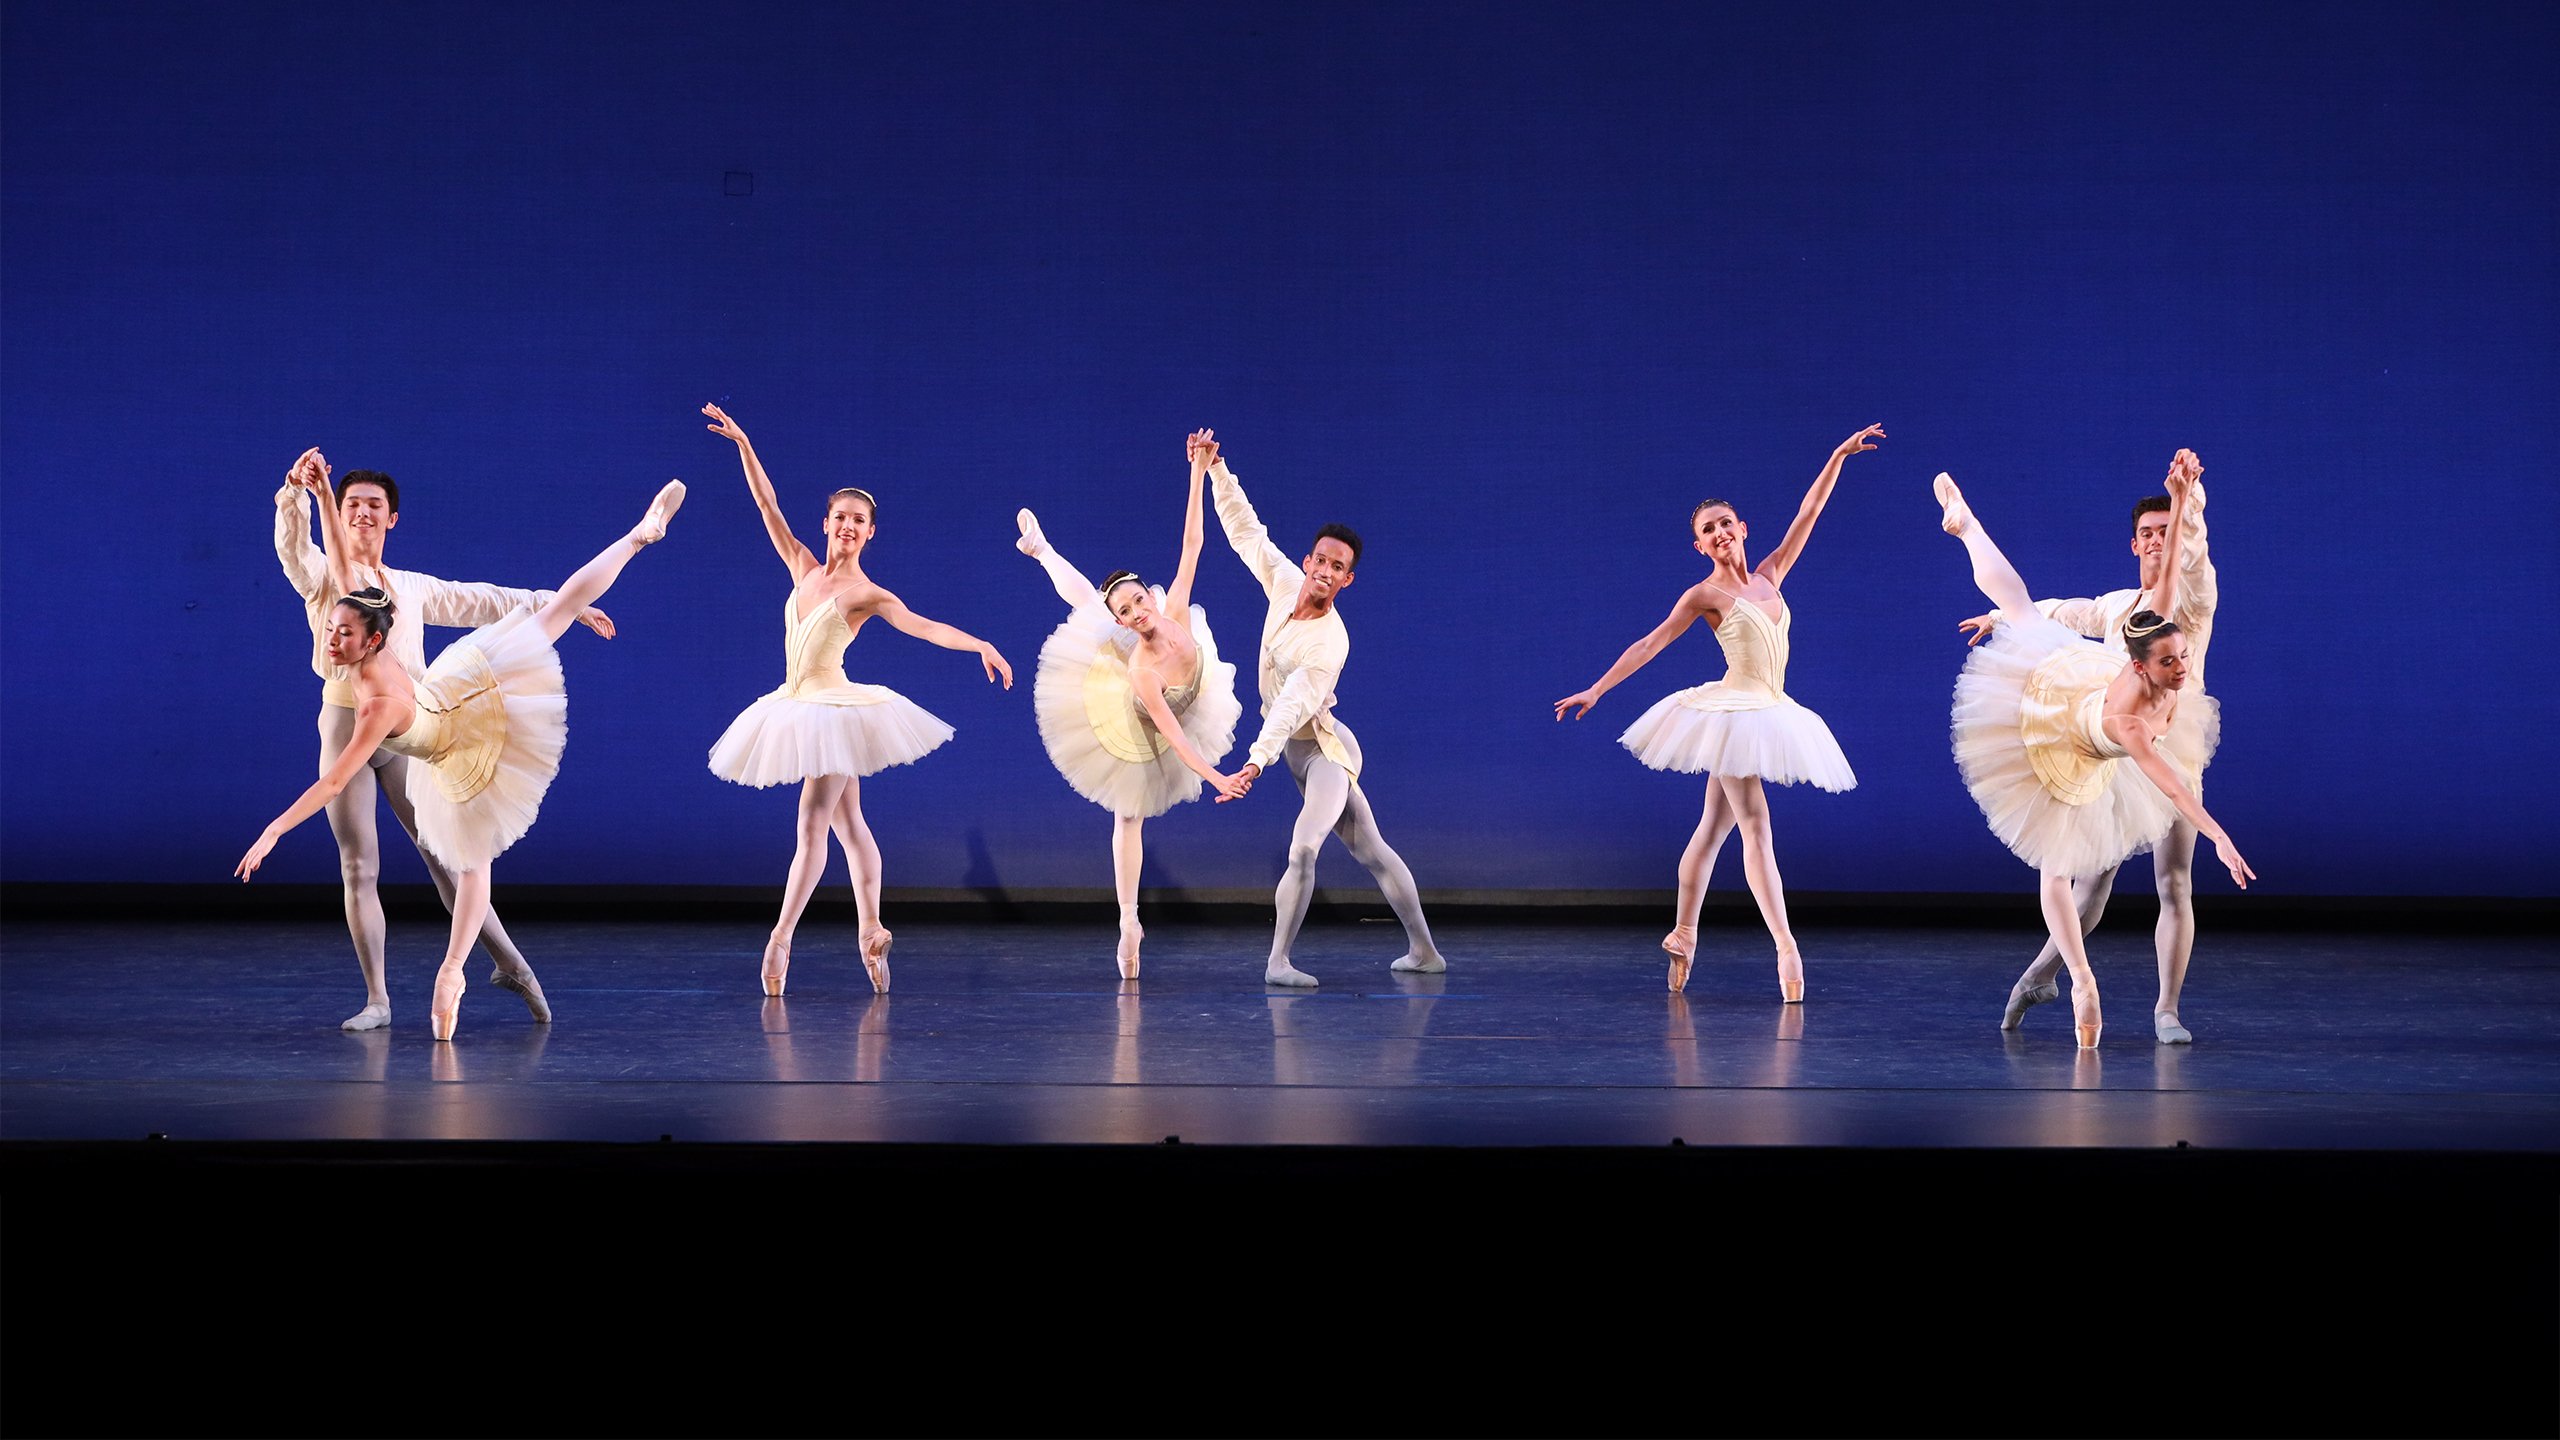
The first one was when my friend and I saw the Sarasota Ballet and their "Masters of Movement" performance at the Sarasota Opera House. This was the second show of our subscription, and we both agreed we liked it better than the first one we saw. The "Masters of Movement" performance was a nice mix of class ballet and modern dance (and I usually don't care for the latter).
This first piece was choreographed by George Balanchine, a legend in the ballet world, and set to music by Mozart. It premiered in New York City in 1956, so it's been around for a long time. I totally forgot that I had seen the piece years ago at the Kennedy Center, that time performed by the New York City Ballet (read that blog post here). There is no story or plot, but rather is just meant to appreciate the "elegant and inventiveness" that is "playful, refined, and surprising" (notes from the program). I tried to watch it just to appreciate the movement of dance and the inherent fun in dancing. I really liked it!
While the video below features the Suzanne Farrell Ballet, you can get a taste of the piece:
Mozartiana
The second piece was also choreographed by Balanchine, and while the dancing is set to Tchaikovsky's Suite No. 4, that music is actually the Russian's orchestration of works by Mozart (so I guess kind of like a medley or remix?). This was also a classic piece, and the Sarasota Ballet's version featured some child dancers, too. This one felt a little less fun than the previous, but still just as beautiful.
This video was filmed in 1983 soon after Balanchine's death (he choreographed the piece in the early 80's just a few years before he died). But this is the full thing, so you can really appreciate it.
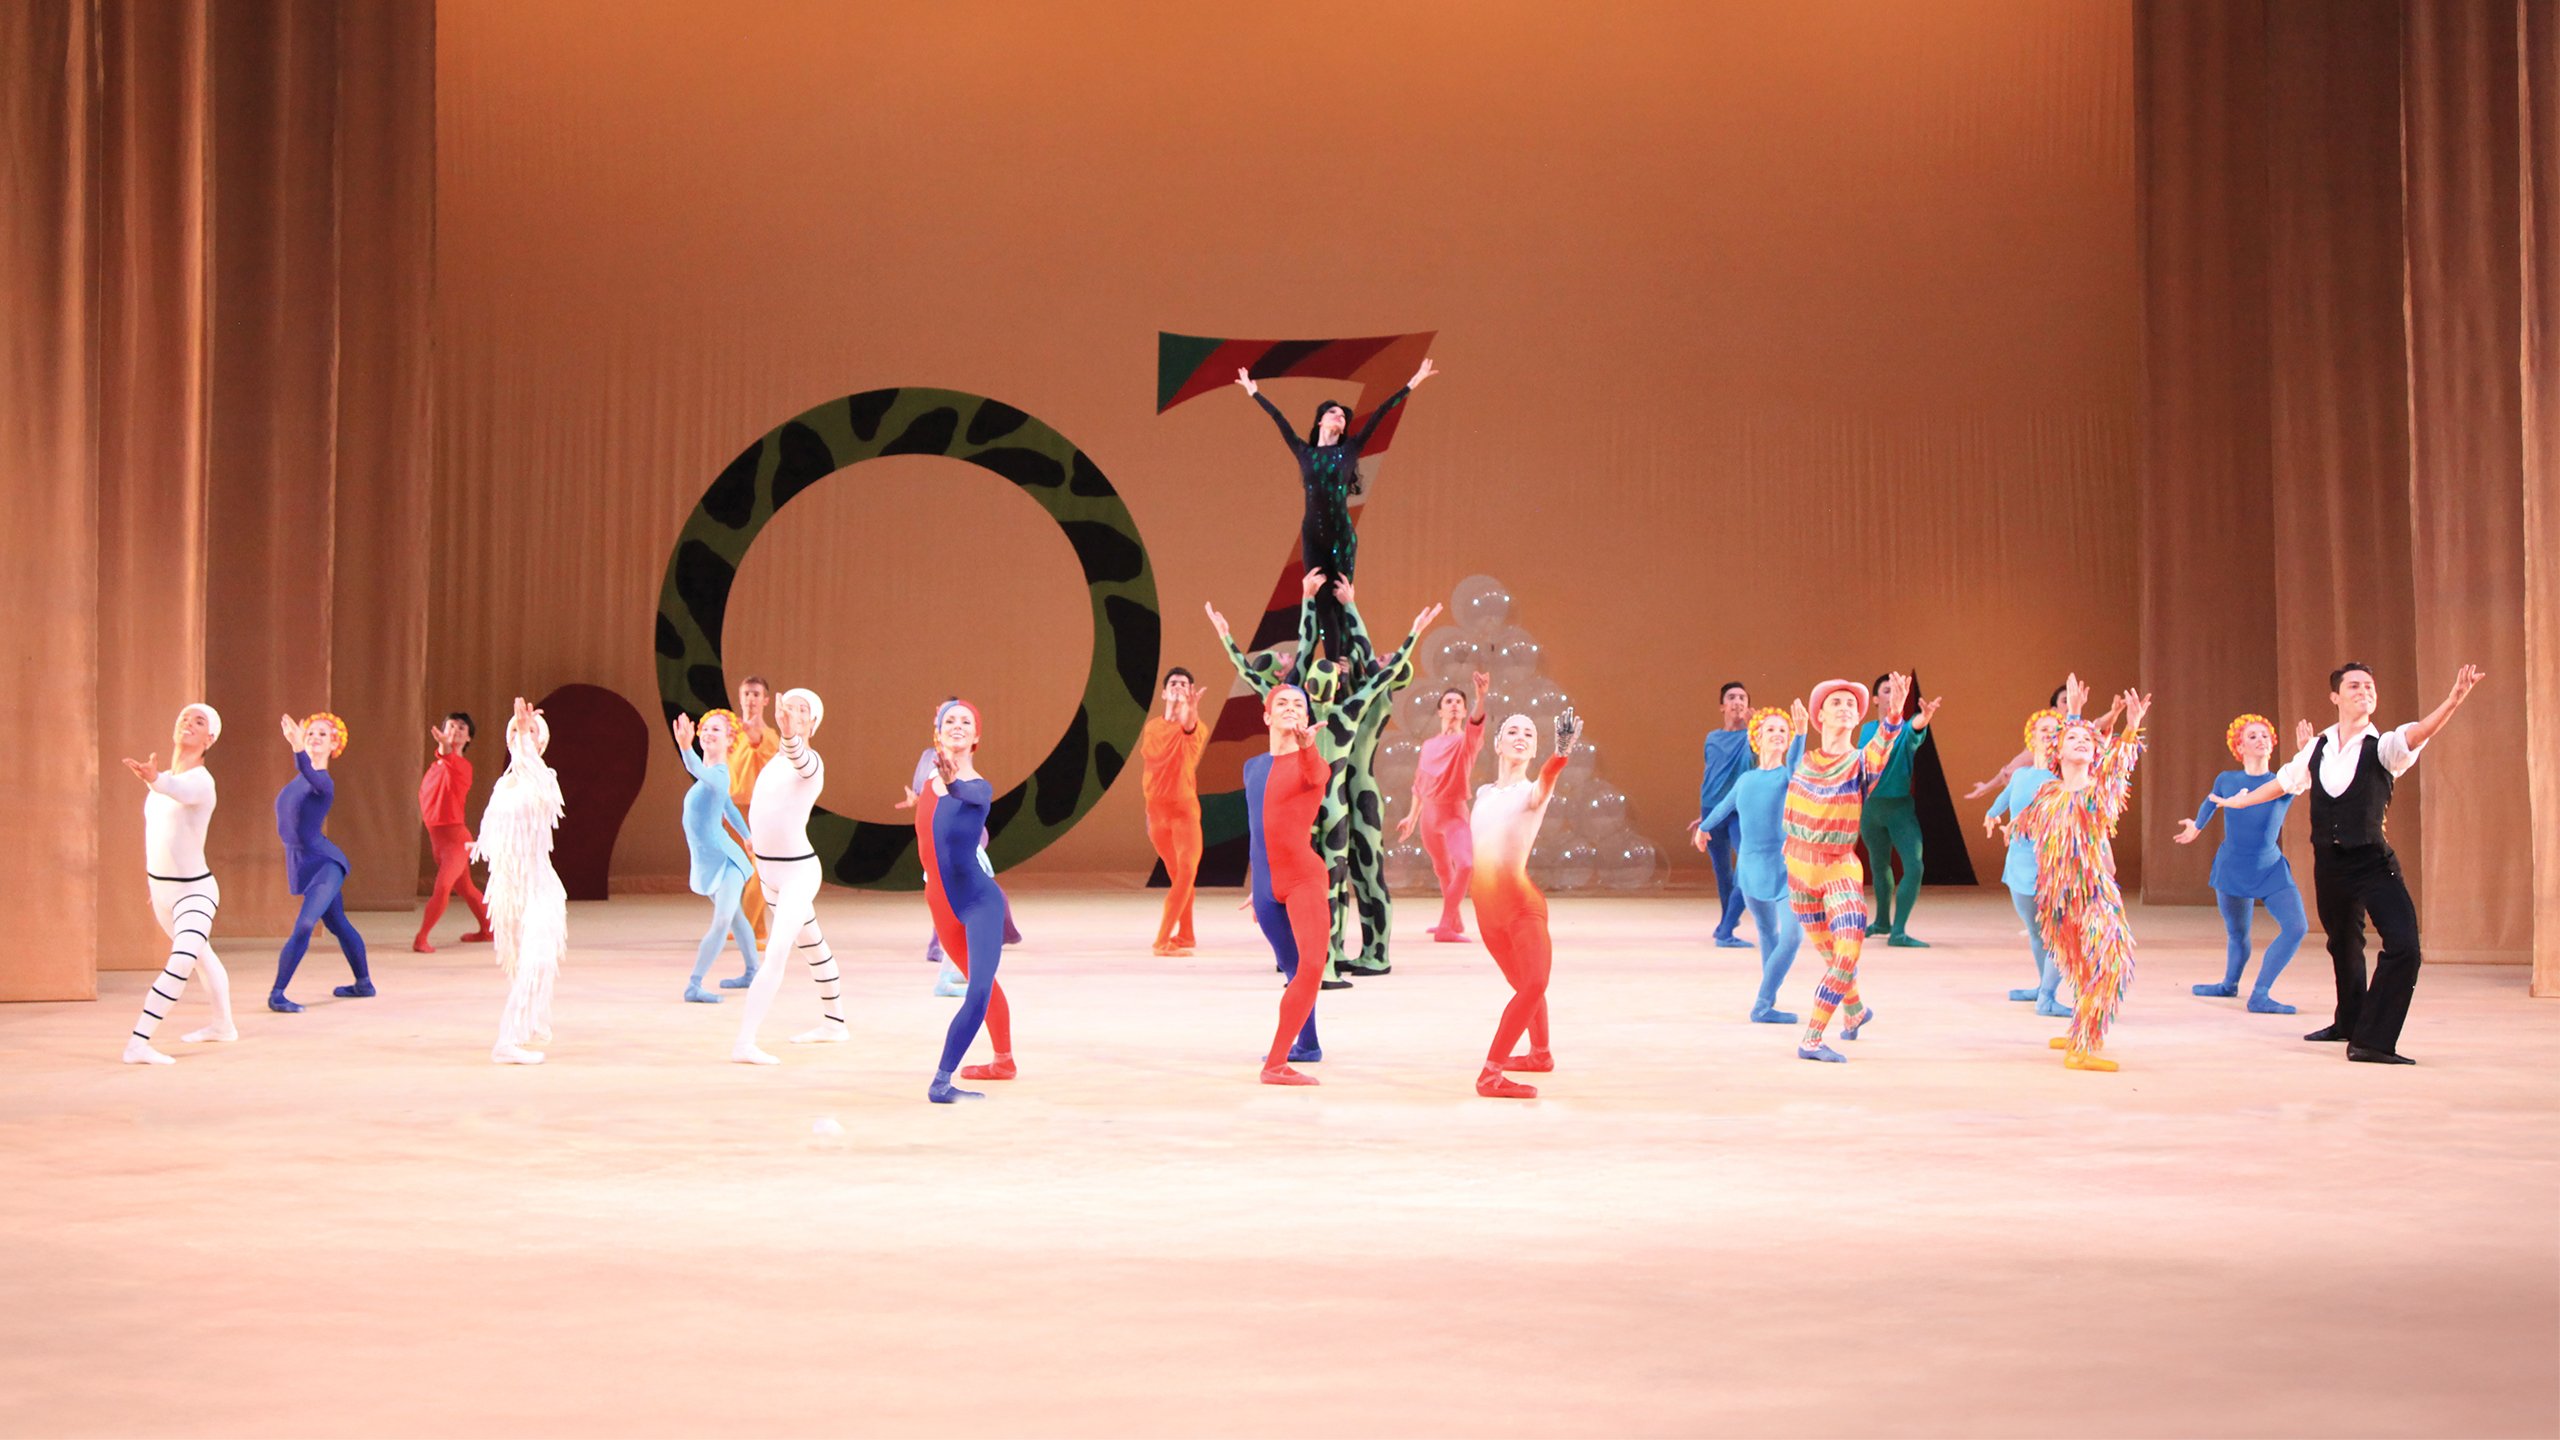
Even though this was the modern dance piece, my friend and I liked it the best! It was so fun, so creative, and just very different! Sir Frank Ashton choreographed the piece in the late 1960's and based it on the nursery rhyme, "Monday's Child," creating a dance for each day of the week set to jazz music from the era. I had actually seen the Friday dance at the Sarasota Ballet's gala last year, but I didn't know that at the time! So it was cool seeing it again along with all the other "days." The music, written by Sir Richard Rodney Bennett, is so lively, and each part was exciting with all the colorful costumes. It kind of reminded me of the "sweets" featured in the Nutcracker: each one is unique but just as fun as the others.
Here is a preview video from the Sarasota Ballet so you can see the awesome costumes and some of the artwork/structures that went along with the dancing:
What a great show! The next performance from our subscription isn't until March, so I'm glad I got to see another ballet show so soon. Just a few days later, my mom and I saw the Sarasota Ballet School perform The Nutcracker (I LOVE the Nutcracker and had not seen it the past two years, so I was really looking forward to it, especially because I got to see it with my mom!).
There were 130 students (!) in the production from multiple studios, and we were so impressed! Their ages ranged from teeny tiny girls, maybe four years old, to the Sugar Plum Fairy (played by Kerry Shannon, a new member of the Sarasota Ballet Studio Company, and she was SO good!), who is probably in her early 20's. Because there were so many dancers, they had to get creative with the roles. For example, the Arabian Coffee dance (what they called the "desert dance" for some odd reason) featured three boys and three girls (six dancers total), when usually that piece is performed by only women or is featured as a pas de deux. But it's so nice that all the students could be included.
Along with Shannon, we also thought Violet Olson, who played Clara, and Gregory Dempsey, who played the Nutcracker prince (Nathaniel?) did a great job as well. It was nice that, because they are both teenagers, they seem age-appropriate as a couple, as opposed to the traditional Nutcracker in which Clara, a young girl, is with a grown man prince.
Here's a little video from a few years ago. These kids are really talented!
And you can check out this article in The Sun about this year's production, too!
My mom bought me the Toll House Nestle's "3 Books in 1" more than 10 years ago, and it's my go-to cookbook for baking cookies. Over the holidays, I knew I wanted to make peanut butter cookies, and this recipe was a no-brainer.
Ingredients
1 1/4 cups all-purpose flour
1/2 tsp baking soda
1/2 tsp salt
1/2 tsp ground cinnamon
3/4 cup (1.5 sticks) butter or margarine, softened
1/2 cup granulated sugar
1/2 cup packed brown sugar
1/2 cup creamy peanut butter
1 large egg
1 tsp vanilla extract
2 cups semi-sweet chocolate chips (I probably used half a cup, whatever I already had left.)
1/2 cup coarsely chopped peanuts (I used peanut butter chips instead.)
Directions
Preheat the oven to 375 F.
Combine flour, baking soda, salt, and cinnamon in a small bowl. Beat butter, both sugars, and peanut butter in a large mixing bowl until creamy. Beat in egg and vanilla extract. Gradually beat in flour mixture. Stire in morsels and peanuts.
Drop dough by rounded tablespoon onto ungreased baking sheets. Press down slightly to flatten into 1-inch circles.
Bake for 7-10 minute or until edges are set but centers are still soft. Cool on baking sheets for 4 minutes; remove to wire racks to cool completely.
These cookies ended up being a lot bigger and more fragile than I expected. So I think I made them too big and underbaked them (for fear of having crunchy cookies, I'd rather them be too soft than too hard!). My scoop was probably bigger than a tablespoon, so that could have been the problem; our peanut butter is also very oily, so that might have made them spread more, too. Next time, I would make them smaller, and I'd make sure I saw some browning on the bottoms of all the cookies before taking them out of the oven. These still tasted delicious, but they broke apart so easily, so they didn't look as good as I would have hoped. Certainly worth trying again!
I have made many a pumpkin recipe (I love all things pumpkin!), but I wanted to try a pumpkin pie recipe that I had never made before. I found this recipe on the Cooking Classy blog, and with only six ingredients, I knew this would be a piece of cake... or pie rather ;)
Ingredients
1 (9-inch) refrigerated pie crust (store-bought)
1 (15 oz) can pumpkin puree (not pie filling)
1 (14 oz) can sweetened condensed milk
2 large eggs
2 1/2 tsp pumpkin pie spice
1/4 tsp salt
Directions
Set oven rack in lowest position of oven and heat oven to 425° F.
Thaw the chilled pie crust according to package directions, unroll and then fit into pie dish. Decorate edges if desired.
In a mixing bowl whisk together pumpkin, sweetened condensed milk (scrape in any excess from can), eggs, pumpkin pie spice, and salt until well blended.
Pour mixture into pie crust then wiggle to level. Set on a baking sheet. If you don't want the crust edges to get overly dark you can cover them with a ring of aluminum foil.
Transfer pie on baking sheet to oven and bake on lowest rack in preheated oven 15 minutes. Leave in oven, reduce temperature to 350° F and continue to bake until pie is nearly set (filling no longer jiggles when moved), about 35 to 40 minutes.
Transfer to a wire rack and let pie cool at least 2 hours before slicing. For a chilled pie rest 1 hour at room temperature and then 2 hours in the fridge.
Unfortunately I did not actually have any pie crusts. My sister and mom went out shopping, and they only bought ONE box of pie crusts (2 crusts each) instead of TWO boxes, and I knew I had to use two pie crusts for the apple pie later (find that recipe here). So I used a Pillsbury dough sheet instead; since that cooks a lot faster, the edges of the crust burned almost immediately. I tried to salvage it but putting aluminum foil around the edges, but the damage has been done, and then the foil ended up tearing little holes at the top surface. So this pie (like my peanut butter cookies) did not look, but at least it tasted yummy! I usually make pumpkin pie with evaporated milk instead of condensed milk, so this version was creamier and thicker. I would certainly consider this a traditional pie, great for the holiday season!
I had never made this recipe before, but it sounded delicious and I wanted to try it. I found the recipe on the Minimalist Baker blog (not baking, but still!).
1 cup white quinoa (rinsed in a fine mesh strainer*)
1 Tbsp agave nectar (optional)
Directions
If serving with coconut quinoa, begin by washing thoroughly in a fine mesh strainer. Add to a medium saucepan over medium heat and toast for 3 minutes. Add light coconut milk and 1/2 cup water (amount as original recipe is written // adjust if altering batch size). Bring to a boil, then reduce heat to simmer, cover and cook for 15 minutes or until the quinoa is light, fluffy and the liquid is absorbed. Set aside until serving.
In the meantime, heat a large saucepan or pot to medium heat and add coconut oil. Add the onion, garlic, ginger, carrot, broccoli and a pinch each salt and pepper and stir. Cook, stirring frequently, until softened – about 5 minutes.
Add curry powder, cayenne (or chili pepper), veggie stock, coconut milk, another healthy pinch of salt and stir. Bring to a simmer then reduce heat slightly and continue cooking for 10-15 minutes.
Add the snow peas and tomatoes in the last 5 minutes so they don’t overcook.
Serve over coconut quinoa and garnish with fresh lemon juice and herbs (optional).
My main problem with this recipe was the quinoa. Maybe my quinoa has it expired and it's old, or it's the fact that I didn't use light coconut milk but instead mixed cream of coconut with water. But my quinoa did not get light and fluffy. The water did not absorb! But the quinoa was not hard, and it did have a coconut flavor, so I went with it. I also changed a lot of the ingredients. I added cauliflower, shrimp, and bell pepper, while I didn't use broccoli, carrots, or snow peas (I used frozen peas instead). So I kind of made this recipe my own. I did use full fat coconut milk (mainly because I could not find the light version) for the curry itself.
Maybe it was because of the quinoa, but this felt more like a soup. Maybe if I made it again, I would make it more traditional with just rice. But it did taste good, and this makes A LOT of food, so you're guaranteed to have leftovers!
I love Pillsbury crescent rolls, but I usually eat them plain or fill them with something sweet (jam, etc.). Of course there are pigs-in-a-blanket, but I had never thought to make a chicken casserole with them until I round this recipe from Allrecipes.
Ingredients
3 skinless, boneless chicken breast halves
salt and ground black pepper to taste
2 (8 ounce) packages crescent roll dough, unrolled and divided into triangles
1 (10.75 ounce) can condensed cream of mushroom soup
1 (10.75 ounce) can condensed cream of chicken soup
1 cup milk
1 cup shredded cheddar cheese
Directions
Preheat oven to 350 degrees F (175 degrees C). Grease a 9x13-inch baking dish.
Season chicken breasts with salt and pepper. Heat a large skillet over medium heat; pan-fry chicken until no longer pink in the center, about 10 minutes per side. Shred chicken.
Spread chicken over crescent roll triangles. Roll triangles, starting with the wider end, around chicken. Arrange rolls on prepared baking dish with the seam sides down. Place rolls into prepared baking dish.
Mix cream of mushroom soup, cream of chicken soup, milk, and cheddar cheese in a bowl; pour mixture over crescent rolls.
Bake in preheated oven until bubbly and rolls are golden brown, about 40 minutes.
The hardest part about this recipe is trying to fit the chicken into the crescent rolls and not let any fall out! But other than that, this recipe is super-easy to make. I even diced up the chicken and cooked it in the air fryer, which I think is a faster option. The photo online shows broccoli in the casserole, which clearly is not listed in the ingredients. So instead I made broccoli on the side so that we had a green vegetable with dinner (because otherwise, this dinner is not healthy AT ALL). But it sure does taste good!
I had planned to bake with my vegan friend while my husband watched football (anything to keep ME from having to watch!), but then she had to visit her dad over the weekend, so we made this vegan lemon cake after work one day. We each brought some ingredients to the table (no pun intended), and I think it turned out very well! Thanks, Anthea from Rainbow Nourishments for the recipe!
Ingredients
Vegan Lemon Olive Oil Cake
2 ½ cups (315g) all-purpose plain flour spoon and leveled (note 1 for gluten-free option)
1 ¼ cups (250g) granulated sugar
3 teaspoons baking powder
Pinch of salt optional
1 cup (250g) dairy-free milk room temperature
½ cup (125g) extra virgin olive oil
⅓ cup (80g) lemon juice (note 2)
~2 tablespoons lemon zest
1 teaspoon vanilla extract optional
To decorate (optional, see note 2 for alternatives)
1 ½ cups (150g) powdered sugar / icing sugar
2-3 tablespoons lemon juice
1 cup (150g) fresh berries
Instructions
To make the cake:
Preheat your oven to 180°C (355°F). Line an 8-inch (20 cm) loaf pan with parchment paper.
Add all the dry ingredients (all-purpose flour, sugar, baking powder and salt) to a large bowl. Mix until there are no lumps. Add all the wet ingredients (milk, oil, lemon juice, lemon zest and vanilla) and mix until just combined.
Pour the lemon cake batter into your prepared pan. Smooth the surface if necessary.
Bake the cake for 1 hour or until you can insert a toothpick in the center of the cake and there's no wet batter on it. As this is a moist cake, some crumbs on your toothpick are fine. If the surface of your cake is browning too quickly, carefully tent the pan with aluminum foil.
Allow the cake to cool in the loaf tin for 10 minutes then let the cake cool on a cooling rack.
To make the icing:
Add the lemon juice and sugar to a medium bowl and mix until smooth. Add more lemon juice or non-dairy milk for a thinner icing (like a lemon glaze) or more powdered sugar for a thicker icing.
Drizzle the icing over your cooled cake. If desired, top the cake with berries just before serving.
Store the cake in an airtight container at room temperature for a day or in the fridge for up to 3 days. The cake can be stored without the icing in the freezer for up to 1 month.
Notes
This lemon cake works well with King Arthur's gluten-free measure for measure flour. If using, I suggest baking the cake for 5-10 minutes longer. Other gluten-free flour blends may produce different results.
You'll need around 2-3 medium lemons to yield the amount of lemon juice and zest for the recipe.
Alternatively, you can enjoy the cake plain, topped with fresh berries or a light dusting of powdered / icing sugar.
Her oven only went to 350°F (We couldn't get 355°F; the oven just automatically jumps to 375°F after that), but it wasn't an issue. And we used plain soy milk, so I can't speak to how the recipe would work or taste if you used almond milk, coconut milk, etc. We only ended up using two lemons, although they were on the large side. We used all the zest and most of the juice in the cake, but put a little bit of juice in the icing (along with Jack Daniel's Tennessee Honey whiskey, since we like boozy icing!). And rather than decorate the whole cake with berries, we decorated each PIECE with blueberries and raspberries, which meant more berries per slice!
This recipe was easy to make, and I would certainly do it again (as long as my friend provides the non-dairy milk!).
I am amazed by all the fun recipes there are on Instagram! I found this recipe from Hailey Pipher @shelikesmilk. Another easy and delicious recipe, just how I like it!
Ingredients
1/3 cup brown sugar
3 tsp cinnamon
2 1/2 apples, peeled and rough chopped
2/3 cup + 3 tbsp granulated sugar
1/2 cup softened butter
2 eggs
1 1/2 tsp vanilla
1 1/2 cups flour
1 3/4 teaspoons baking powder
1 tsp salt
1/2 cup + 3 tbsp milk
1 cup powdered sugar
Directions
1. Preheat oven to 350 degrees F. Prep your 9x5” loaf pan with a non-stick spray or line with parchment paper.
2. Mix 1/3 cup brown sugar and 2 tsp cinnamon in a small bowl, set aside. Toss cubed apples with 2 tbsp granulated sugar and remaining 1 tsp of cinnamon in a separate bowl, set aside.
3. In a stand mixer or with a hand mixer, beat 1/2 cup softened butter and 2/3 cup granulated sugar together until fluffy, approx. 2 minutes. Add eggs and vanilla, then continue to mix.
4. Gently mix flour, baking powder and salt in separate bowl, then slowly add to creamed butter mixture until fully combined. Add 1/2 cup milk into this mix until smooth.
5. Pour half the batter into the lined loaf pan and add half of the apple mixture on top of the batter in the pan. Sprinkle half of the brown sugar and cinnamon mixture on top of the apple layer.
6. Repeat and add the remaining batter overtop and top with remaining apples and brown sugar mix. Use a knife or toothpick to gently swirl the apple mixture into the batter, ensuring the apples on top layer or patted into the loaf batter.
7. Bake until toothpick inserted into middle of loaf comes out clean, about 1 hour. Allow loaf to cool on wire rack after baking.
For the Icing:
Combine and mix powdered sugar with remaining 3 tbsp of milk. Add more milk or powdered sugar to reach desired consistency. Drizzle loaf with glaze.
Every step of this recipe is so yummy! The sugar cinnamon mixture (I didn't pack the brown sugar since the directions didn't say to), the sugared apples, the batter itself... so good! I used one large apple and a small one, and I melted half the butter (I find working with melted butter is much easier). I also added a tablespoon of vanilla extract to the powered sugar (to replace one tablespoon of milk) to add some extra flavor. I actually ate mine without icing because I couldn't wait for it to cool: I wanted to eat it NOW! And it was very good, even without the icing!
I had not been to Denver since 2019 (read that blog post here), but when Steve and I saw that Paul McCartney was on tour, we knew this might be our last chance to see the living legend perform. He wasn't performing in Florida, so when we looked at the tour schedule, we thought it would be best to see him at Coors Field: the show was on a Saturday, and we both have friends in Denver, so it was a no-brainer! We booked our stay at the cute Queen Anne Urban Bed & Breakfast (the food was quite good, with fresh-baked cookies every afternoon, too!), and I made our itinerary to make the most of our weekend out West.
Here are the highlights from the trip (in no particular order):
Watching Paul McCartney live
This of course has to be the best part because it's the reason we flew all that way! For being in his early 80's, he seems to have a lot of energy (he played for 2.5 hours!), and his voice and finger dexterity on the guitar still seem in pretty good shape. He played some Beatles songs (but not Yesterday, which was a bummer), some Wings songs, and then some of his own stuff. But the best part was when he played Live and Let Die, when there was fire on stage and lots of fireworks! It was so cool and invigorating! I am not listing music videos here because his music is SO iconic; the list would be enormous!
Catching up with said friends
We met up with Steve's friends, Phil and Nikki; they know each other from going to Ravens games up in Baltimore. We partook in $5 martinis at Terminal Bar before enjoying a delicious meal at Mercantile, and we finished the night with cocktails and dessert at the Oxford Hotel's Cruise Room.
I had not seen my Theta sister Alexandra since I visited her in 2019. It was fun to see her and walk around the zoo with her and her family.
Visiting the Denver Zoo
Speaking of the Zoo, we had so much fun seeing all the different animals! We didn't want to wait in the LONG line to see the lion cubs, so we missed out on that. But we got to see almost everything else. I especially liked the reptile house; they had so many frogs and lizards I had never heard of before! But the signage in general around the zoo is lacking: they aren't very informational, with most signs just listing the common and Latin names of the animals. But we got lots of our steps in and enjoyed the beautiful sunny weather while checking out all the cool creatures.
Going to a concert at Red Rocks
Once we decided to go to Denver, we knew we wanted to check out Red Rocks, too, which is an outdoor amphitheater built into the rocks outside of the city. All Time Low was playing the night after the McCartney concert; we had never heard of them before, but we just wanted to see the venue. We were able to take a shuttle from Union Station (how convenient!), and the space is SO cool. And not only that, but the concert actually had three openers, so it felt like we were at a music festival! We saw The Paradox (probably my favorite of the night), The Cab, and Mayday Parade before the main act. We hadn't heard of any of these groups, but we had a great time. In the end, the lead singer of All Time Low, Alex Gaskarth, was losing his voice, and after just a few songs he had to cancel the rest of the show (and maybe the tour?); he felt really bad about it, but that meant we could head back early (and get warm!). I hope he feels better soon!
This was such a fun, little trip! I really enjoy jet-setting (I flew to Las Vegas once for ONE day to see Gwen Stefani in concert with my sister!), so it was awesome to take a quick flight to Denver, spend a weekend doing ALL this neat stuff, and then just head back home to return to reality. We are so lucky to be able to do things like this!
We've got a few local get-aways coming up before the holidays, so stay tuned on those! I can't believe 2025 will be over before we know it! What other adventures are in store?!
My friend Tammy was hosting book club again, and since she's vegan, I always try to make a vegan recipe (check out the vegan rum cake I made!). Since it's fall, I thought a pumpkin cake would be appropriate. I found this recipe on the "Plant Based on a Budget" blog and thought it was worth a try.
Ingredients
3 ½ cups of all-purpose flour
2 tablespoons of baking powder
2 teaspoons of baking soda
½ teaspoon of salt
1 cup of packed brown sugar
½ cup of granulated sugar
1 ½ tablespoon of ground cinnamon
1 tablespoon of pumpkin pie spice
1 cup of chopped pumpkin seeds, walnuts, or pecans (optional)
1 ¼ cups plant-based milk of choice
1 cup of vegan butter, melted
1 (15-ounce) can of pumpkin puree
Directions
Preheat the oven to 350 degrees F. and fully grease a bundt cake pan with vegan butter, then sprinkle a little flour in the cake pan. Move the pan around so the flour gets distributed and stuck to all of the inside of the cake pan.
In a large bowl, add the flour, baking powder, baking soda, salt, both sugars, cinnamon, pumpkin spice, and pumpkin seeds, walnuts, or pecans (if using). Mix well and set aside.
Make a well in the center of the flour mixture, add the plant-based milk, melted vegan butter, and pumpkin puree. Mix using an electric mixer or by hand. Mix until all ingredients are fully incorporated, but do not overmix.
Pour the cake batter into the bundt cake and level it with a spatula.
Bake the cake for 1 hour or insert a fork into the cake, if the cake comes out clean, the cake is ready. If it’s not, bake in 5 minute increments until fork comes out clean.
Place the cake pan on a cooling rack for 10 minutes. With a butter knife, gently insert it around the edges to loosen it up. Gently shake and tap the cake pan to help loosen it. When you feel the cake has separated from the walls of the pan, place a cooling rack on top of the pan and then flip the cake onto the cooling rack. Remove the pan and allow the cake to cool completely before frosting.
To make the frosting: In a medium bowl, add the vegan cream cheese frosting, pumpkin spice and 2 tablespoons of plant-based milk. Mix well using a mixer or a whisk. Mix well and add more plant-based milk to achieve a slowly runny consistency.
Drizzle the frosting on the cooled cake and sprinkle some more nuts.
I didn't have plant-based milk, so I just used water (that's what most of those are anyway, right?), and instead of vegan butter I used applesauce. There were a few questionable things about this recipe, mainly the amount of baking powder and cinnamon. Usually those are things measured in teaspoons, not tablespoons. TWO tablespoons of baking powder sounds like A LOT. So I just did two teaspoons instead (same for the cinnamon). I don't think if these changes really impacted the recipe, but the cake did come out kind of dry and dense. Not bad, but icing definitely helped (I made a bourbon icing to go on top, which is just 1 cup of powdered sugar and two tablespoons of bourbon mixed together). You could probably eat it with applesauce on the side to add some moisture, too!
This was not as good as the rum cake, so I'm not sure I would bother making it again. But next week I'm going to try making a vegan lemon cake, so look out for that post!
'Tis the season! I love all things pumpkin, and when I was invited to a party over the weekend, I knew I had to bring some sort of pumpkin dessert. I have made many pumpkin desserts in my time (see the list at the bottom of this post), but I wanted to try something different. And since I always have cream cheese in the house given my husband's obsession with bagels, this recipe from Pop Sugar was a no-brainer.
Ingredients
6 tablespoons unsalted butter, melted and cooled, plus more for greasing the pan
1 package (8 ounces) cream cheese, at room temperature
Directions
Preheat the oven to 350°F. Butter and flour a 13-by-9-inch casserole dish.
In a large mixing bowl, whisk together the butter and 1 1/2 cups sugar until smooth. Whisk in 2 eggs, pumpkin, and 1/3 cup water until well blended. In another mixing bowl, whisk together the flour, salt, cinnamon, baking soda, baking powder, and nutmeg. Fold into the butter mixture until no streaks of flour remain. Spread batter evenly in the prepared casserole dish.
In a bowl, with an electric mixer on medium speed, beat cream cheese, remaining egg, and remaining 1/4 cup sugar until smooth.
Drop cream cheese mixture in evenly spaced 1-tablespoon dollops over the batter. Use a butter knife to swirl the batter, gently folding some of the cream cheese mixture under the pumpkin batter.
Bake until the center of pumpkin batter (not the cream cheese mixture) springs back when touched, about 30 to 32 minutes. Let cool completely in pan and then cut into 20 bars.
I pretty much stuck to this recipe, although I just sprayed the pan instead of using butter/flour. Everything else was the same. The pumpkin part tastes great, just as you'd expect. But the cream cheese part is a little... claggy, somewhat gelatinous. The cream cheese was not room temperature, so perhaps microwaving it a little to soften it messed things up? Unsure. I think what would taste better would simply be cream cheese frosting on top. But not a total waste!
Easy Pumpkin Roll(I remember I was especially proud of myself making this for Thanksgiving during COVID. My dad doesn't like pumpkin desserts, but he loved this one, probably because of all the cream cheese icing!)
I have heard of "marry me" dishes before (chicken, pasta, etc.), but I had never tried it before. I wanted to make a nice meal before the fast for Yom Kippur began, so I tried this recipe from Southern Living. I thought it turned out pretty well!
Ingredients
4 (3-oz.) chicken breast cutlets (about 1/2-in. thick)
2 Tbsp. olive oil
3 Tbsp. unsalted butter, divided
1 tsp. kosher salt
1/2 tsp. ground black pepper
1 large shallot, finely chopped
1/2 tsp. crushed red pepper
1 tsp. dried oregano
1 tsp. fresh thyme leaves
4 cloves garlic, minced
1 Tbsp. tomato paste
1/2 cup dry white wine (such as Pinot Grigio or Sauvignon Blanc)
1/2 cup chicken broth
1/2 cup sun-dried tomatoes, chopped
1/2 cup heavy cream
1/2 cup grated Parmigiano Reggiano, plus more for garnish
1 tsp. balsamic vinegar
Basil leaves, for garnish
Directions
Preheat a stainless steel or enameled cast-iron skillet over medium heat, then add olive oil and 2 Tbsp. butter to the skillet. As the butter melts, season the chicken cutlets with salt and black pepper.
Add the chicken cutlets to the skillet and cook until the outsides are lightly browned and the interior reaches a temperature of 165°F (approximately 2-3 minutes on each side).
Transfer the chicken to a plate. Cover with aluminum foil to keep warm. Do not clean the skillet.
Add shallot, red pepper flakes, oregano, and thyme to the skillet and cook until the shallot starts to soften, about 3 minutes.
Add garlic and sun-dried tomatoes to the skillet and cook 1 minute or until the garlic becomes fragrant.
Add tomato paste to the skillet and stir to coat the vegetables. Cook 1 minute, or until fragrant.
Pour the white wine and chicken broth into the skillet and cook, scraping up any flavorful bits from the bottom of the skillet.
Reduce the heat to medium-low and add the heavy cream to the skillet. Stir to combine and simmer until the sauce begins to thicken, about 2 minutes.
Return the chicken cutlets to the skillet and simmer in the sauce until the sauce clings to the chicken (about 4 minutes).
Remove the skillet from the heat and stir in the grated Parmigiano Reggiano.
Add the remaining tablespoon of butter and the balsamic vinegar to the skillet and stir until the butter fully melts into the sauce. Garnish with grated Parmigiano Reggiano and fresh basil leaves.
First of all, I skipped the entire part about cooking the chicken on a skillet. It's so much faster in the air fryer! So while the chicken was cooking in the air fryer, I started making the sauce right away. I didn't have all the ingredients or spices, but I used what I had (parsley instead of time, pasta sauce instead of tomato paste, etc.). Making the sauce was very easy!
After I had added the chicken to the sauce, I served everything over penne pasta (I already had leftovers of that, so I just quickly microwaved the noodles). I thought this recipe was good, but I might add mushrooms and/or spinach in the future just to have some more veggies (we made side salads instead). I would certainly make this recipe again!
I have not had the chance to travel for work in a long time, so I was very excited to not only go to Canada for work, but I got to plan the trip, too! It was great working with the Bruce Hotel and researching restaurants and other fun things to do in town (other than the Stratford Festival for theatre, of course!). And even though I was there for work, I had a lot of fun doing my own thing, too. Here were the highlights in no particular order:
1. Staying at the Bruce Hotel
When I first started planning this group trip to Stratford, my boss was insistent that the Bruce Hotel was the only place worth staying. And boy was he right! The Bruce is a very fancy, 5-star hotel, with extremely attentive staff and lots of food included in your stay (apples and pastries in the room upon arrival, breakfast each morning, little candies after each meal, etc.). The rooms were beautiful with ginormous bathrooms; you know I had to take a soak in the tub my first night there to decompress! And the grounds are lovely, with a little meadow walk out back (they have an apiary!) and pretty gardens. Our group was so comfortable there, and all of us said if we made it back to Stratford, we would be sure to stay at the Bruce again!
There was a pumpkin patch behind the Bruce Hotel, and I found an apple tree, too!
2. Starting off my mornings at Modo Yoga
I knew I wanted to exercise each day, but since Stratford is too small to have a Pure Barre or Orangetheory, I opted to take hot yoga (and other classes) at Modo Yoga (formerly Moksha Yoga). The owner, Christa, taught most of the classes I took. She was so kind and welcoming, taking the time to tell me more about the history of the studio and really bringing me into the fold. I made sure to bring a new washcloth with me to each class to wipe off ALL the sweat (I learned quickly not to pick a spot right underneath a heat element!), so there was definitely some detoxing going on. I also took a fusion class and a barre class, but I think the yoga classes were my favorite.
These were the Thai noodles from Mercer. So yummy and a very good size portion (with big shrimp, too)!
3. Trying different restaurants around town
While we enjoyed many meals at the hotel, we also tried several restaurants in downtown Stratford. On my first night, since I was on my own, I went to Stratford Raja INC. for some Indian food. Raja did not disappoint! I had the samosas, dansak, and peshwari naan (i.e. lots of fruity/sweet options). And I made those leftovers last over a couple of meals. The same goes for our group lunch at Mercer Hall; three courses means lots of leftovers, including Thai noodles and carrot cake for breakfast! I also enjoyed lunch at Bluebird one day, where I had raw oysters, an heirloom tomato salad, and a delicious English dessert called posset, which is like a custard. Delicious!
These were my souvenirs (other than the ice wine I bought and drank while there!)
4. Exploring the chocolate trail!
Along with real food, I had many desserts outside of the hotel along the chocolate trail. For $35, you get six vouchers to spend at different sweets stores around town. I had already done my research, so I made sure to get the most bang for my buck! I tasted amazing truffles from Rheo Thompson Candies (including their fancy mint smoothie chocolates), picked up two retro candy bars from the Small-Mart, and ate a fudge sundae from Jenn and Larry's for lunch! And there was more! This was so much fun: every city should have its own dessert trail like this!
5. Going to a cat café
I had heard of cat cafés before and walked past the one in Georgetown several times, but I had never been to one before. I had some time to myself, so I stopped into Alley Cat Cat Café to pet some cute kitties for a half hour. Black cats get a bad rep, but I swear these were the cutest and most friendly of the bunch. They had more than ten (!) cats, but most of them were sleeping and seemed to get along okay with each other. I hope they get adopted soon!
6. Walking along Lake Victoria/the Avon River
The whole town of Stratford was designed after Stratford-upon-Avon in England, home of Shakespeare. So the manmade lake is called Lake Victoria, but it's also called the Avon River. It was so pleasant to walk along the water and see the weeping willows, mallards, Canada geese, and kayakers. We had such amazing weather (low 70's and sunny), so I wanted to spend as much time outside as possible. We also stopped by Art in the Park where many artists were selling their wares. I could only fit a small ornament in my bag, but I took business cards in case I want to have a custom piece sent to me!
This artwork is a fabric collage that was sewn together and then stretched onto canvas. So cool!
While I didn't like the storyline, the costumes from Dangerous Liaisons were amazing!
7. Experiencing the theatres
The whole point of the group trip was to see theatre. Most of our group went to a matinee and an evening show, so that's six shows in three days! I skipped the matinees so I could explore town, but I did see the plays at night. I saw Annie, Dangerous Liaisons, and Sense & Sensibility (and I only slept a little bit during each one!). But more than the shows, I really enjoyed the backstage tour we had at the Tom Patterson Theatre. It was renovated in 2020, so everything is very new. And it's an international building, featuring wood, stone, and other materials from all over the world. There are large windows along one side of the building closest to the water so you can see the natural views. The building is quite a masterpiece and designed specifically for the theatre, so that's really cool!
The cafe at the Tom Patterson Theatre looks like a fancy hotel lobby!
I bought several large zucchini thinking I would make zoodles, but then I came across this casserole recipe from Eating Well, and since I had all the other ingredients, I thought I would try it.
Ingredients
4 tablespoons unsalted butter, divided
1 pound boneless, skinless chicken breasts, trimmed and cut into ¾-inch pieces
1 teaspoon freshly ground black pepper, plus more for garnish
¼ teaspoon salt
3 tablespoons all-purpose flour
¾ cup unsalted chicken broth
½ cup whole milk
4 ounces reduced-fat cream cheese, at room temperature
1 cup shredded low-moisture part-skim mozzarella cheese, divided
½ cup shredded Pecorino Romano cheese, divided
Directions
Preheat oven to 400°F. Melt 1 tablespoon butter in a large nonstick skillet over medium-high heat. Add chicken pieces and 1 teaspoon garlic-and-herb seasoning; cook, stirring occasionally, until the chicken is browned and cooked through (165°F), about 8 minutes. Transfer to a large bowl. Wipe the skillet clean. Add chopped zucchini, 1 tablespoon water and 1 teaspoon garlic-and-herb seasoning to the skillet; cook, stirring occasionally, until softened, about 4 minutes. Transfer to the bowl with the chicken.
Add chopped garlic, 1 teaspoon pepper, ¼ teaspoon salt and the remaining 3 tablespoons butter and 1 teaspoon garlic-and-herb seasoning to the skillet; cook, stirring occasionally, until the butter is melted and the mixture is fragrant, about 2 minutes. Whisk in 3 tablespoons flour; cook, whisking often, until the mixture smells nutty, about 2 minutes. Add ¾ cup broth, ½ cup milk and the remaining ¼ cup water; continue cooking, whisking often, until smooth and thickened, about 4 minutes. Stir in 4 ounces cream cheese until smooth and well combined, about 1 minute. Remove from heat and add ½ cup mozzarella and ¼ cup Pecorino, stirring until melted and smooth, about 1 minute.
Spread half of the cheese sauce in the bottom of a 2-quart baking dish. Add the chicken and zucchini; top with the remaining cheese sauce. Sprinkle with the remaining ½ cup mozzarella and ¼ cup Pecorino. Bake until the cheese is melted and golden brown, about 20 minutes. Let stand for 10 minutes before serving. Garnish with additional pepper, if desired.
To make things easier/cleaner, I baked the chicken (I used thighs) in the air fryer, and once that was done, I put in the zucchini and cooked that in the air fryer, too. So much faster! I also use the diced garlic from a jar and whatever random spices I already had in the pantry.
While the recipe doesn't use this word, I think the butter-flour-cheese mixture is called a "roux," and this was my first time making one. But it worked! It took a little while to thicken up, but once it did, I knew I was on the right track. And even though I forgot to pre-heat the oven until I was half-way through making the recipe, I simply cooked everything until the cheese on top started to brown. And that was just right!
I think the recipe smells better than it tastes. Coming out of the oven, it smells so good! But the taste is just okay. But this could be more about the spices I used (or lack thereof). It's still a pretty good (and easy!) recipe, so I'm still happy I made it. Anything with cream cheese in it is good in my book!
I was supposed to see Lee Brice in concert a few years ago in DC, but at the last minute he cancelled the show with no explanation. So when I got a chance to see him live, I had to get tickets!
You know I had to wear my cowgirl hat, cut-off jeans, bedazzled Betsy Johnson boots, and my Whiskey Girl T-shirt from Dark Corner Distillery, which I visited in 2018 (read that blog post here; the distillery is no longer there, so that's kinda sad!)
I had been to Baycare Sound before to see Brad Paisley in concert (read that blog post here), so I was already familiar with the venue and I had a game plan. First of all, I bought seats closer to the side than the center because we would be closer to the large fans; I also invested in a neck fan that did come in handy. My friend and I left early enough to beat rush hour, and we parked on the street I was familiar with for ONE dollar for the entire night! We had drinks and tacos at Prelude Sports Bar (great prices, poor service) before walking over just in time for the show to start.
Lee's brother, Lewis Brice, was the first opener. He was good (certainly better than Sting's son; read that blog post here), but doesn't compare to his older brother. Here are some of his songs:
Blessed (He feels extra-blessed now that he has a 16-month-old baby.)
She Loves My Country (This song is to the tune of Puddle of Mudd's "She Hates Me" song, so when I heard the first few chords, I thought, "He's not going to sing that song!" And he didn't; he made a country version!)
I LOVED her outfit!
Next up was Ashley Cooke. I didn't know who she was until she played the last song, "Your Place." I've heard that song on the radio, and I love it! She commented that songwriting is her favorite, and she likes to be clever with the lyrics, and that song is the epitome of just that. Here are some of the other songs she performed:
And finally it was time to see Lee Brice! My friend looked at the set list, and he was planning to sing some of his very best songs, so I was so pumped. His show did not disappoint! And this was actually the kick-off show to his What You Know About That tour; I guess that song is so new that it's not even on YouTube yet!
Hard to Love (I remember when this song came out in 2012!)
Woman Like You (He did NOT play this song, but I love it, so I had to include it in this list!)
SUCH a great concert! I'm so glad I finally got to see him live. I feel like the other country singers I still need to see perform are Garth Brooks and Trisha Yearwood (even better if they're together!), and Luke Combs. AND I would love to see Rascal Flatts when they come to town in February, but I'm not sure if that'll happen. We'll see!


