Last weekend, Steve took me up to Tarpon Springs, which is about a half-hour north of Clearwater. We had never been before, but we knew it was the "Greek Town" of Tampa. I also heard from colleagues that Tarpon Springs is known for their sponge docks (?), so we wanted to check that out. And there happened to be a crafts fair that weekend as well, so we got to enjoy that, too!
The highlights:
Eating lunch at Hellas
Of course we had to eat Greek food for lunch. Hellas is famous up there, and we had to try it. While the restaurant is popular, it's huge, and you don't have to wait too long once your name is on the list. The restaurant has multiple dining rooms and is heavily decorated; it made me think it was the Greek version of Columbia, the Cuban restaurant in Ybor City. Our waiter, Demetrios, was Greek (obviously), and he was very friendly; we are visiting Greece in the fall, so he was giving us tips about where to go (or mostly just confirming that we're planning the right things!).
I ordered the combo of spanakopita and tiropita. The first is spinach, while the other is several kinds of cheese. Yummy!
Tasting at Tarpon Springs Distillery
After lunch, we walked to Tarpon Springs Distillery. We love trying different spirits, and they had A LOT to choose from. The place wasn't very busy, so we actually got a one-on-one tasting with their master distiller, Barry Butler. They offer several kinds of whiskeys, two gins, a rum, and several interestingly flavored spirits like Claresso (coffee but not a liqueur), Guaco Loco (liquid taco), and Aquavit (liquid Reuben sandwich). We skipped the ouzo, since neither of us like black licorice. It was fun trying things we had never tasted before, and it inspired us to get creative with our cocktails at home!
This is Barry. He gave us a private tour of where all the spirits are made and walked us through the process. The tasting and the tour were free (!), so we made sure to buy a bottle. We chose the Gramling Woods Rye Malt Whiskey: it was so good, and seeing as it won a double gold medal, other people like it, too! We'' definitely bring it out during our next bourbon party!
Visiting Breweries
After the distillery, we drove just a couple minutes to East Tarpon Avenue, which feels like the main street of the little downtown area. We visited Two Frogs Brewing Company, which had a large selection of beers, including several sours that don't taste like beer at all (which is how I like it!). We befriended the British man sitting next to us at the bar. He was a beer aficionado, and he had SO many recommendations for breweries in the area. We were driving, so we couldn't go to all of them, but we stopped by a few!
The two pink ones were fruity beers (not sour at all), and the dark one was a Christmas stout (tastes like coffee and chocolate).
After our visit to Tarpon Springs, we drove south to Dunedin. We had gone there a few months ago and did tastings at Cotherman Distilling Co., the Dunedin Brewery, and HOB Brewing Co. But there were even more places to check out! This time we hit up 7venth Sun Brewing Company (and I had a grilled cheese from the Hop Scotch Cafe next door), and Woodwright Brewing Company. That's not even all the breweries in town, so we'll definitely go back. We might event visit Woodwright again, which had live band music trivia, which is pretty cool!
We have lived in Florida nearly two years now, and we love exploring our new home. There are so many more places to see and things to do! But our next adventure is St. Louis, MO. Stay tuned for that blog post!
I had a ripe pineapple at home, and I had planned to make fruit salad with it. But the rings came out so perfectly with this coring tool Steve bought me, and he said, "You could make pineapple upside down cake!" I had never made one before, but I found this recipe from Betty Crocker, and I whipped it together just before dinner the other night. Easy is right!
Ingredients
1/4 cup butter
1 cup packed brown sugar
1 can (20 oz) pineapple slices in juice, drained, juice reserved
1 jar (6 oz) maraschino cherries without stems, drained (about 18 cherries)
1 box yellow cake mix
Vegetable oil and eggs called for on cake mix box
Directions
Heat oven to 350°F (325°F for dark or nonstick pan).
As the oven is preheating, place the butter in a 13x9-inch pan and set it on the middle oven rack to melt. Set a timer for 5 to 7 minutes to remind yourself to check when the butter is fully melted.
Sprinkle brown sugar evenly over melted butter. Arrange pineapple slices on brown sugar. Place a cherry in the center of each pineapple slice, then arrange remaining cherries around slices; press gently into brown sugar.
Add enough water to reserved pineapple juice to measure 1 cup. Make cake batter as directed on box, substituting pineapple juice mixture for the water.
Pour batter over pineapple and cherries.
Bake 40 to 46 minutes (44 to 53 minutes for dark or nonstick pan) or until toothpick inserted in center comes out clean. Immediately run knife around side of pan to loosen cake.
Place heatproof serving plate upside down on top the pan; turn plate and pan over. Leave pan over cake for 5 minutes so brown sugar topping can drizzle over cake; remove pan.
Cool 30 minutes. Serve warm or cool. Store covered in refrigerator.
Like I said, I used fresh pineapple, but I did use a can of pineapple juice for step 4. I used the correct size pan, but the cake was rather small; I only had enough room for 6 full pineapple rings. So I didn't need a whole jar of cherries, either. And while I didn't have boxed yellow cake mix, I did have Funfetti, which worked out just as well.
As for the directions, I had to make a few changes. The butter took MUCH longer to melt than 5-7 minutes. For me, it took at least 10 minutes, so I might recommend just microwaving the butter and then putting it in the pan once the oven has come up to temperature. Then I followed the rest of the instructions until it came to removing the cake to make it, well, upside down. Both the glass dish the cake was baked in as well as the platter I was using for the transfer were very heavy. So I just quickly turned the cake over onto the new plate as neatly as I could, and luckily there was no disaster. But in doing it this well, I did not let the drippings of the brown sugar drizzle onto the cake. But that really wasn't a necessary step. The cake came out SO well! This recipe is so easy to make, plus the dessert is a real show-stopper to look at. I will definitely make this again (next time for more than just me and Steve!).
I knew we had chicken and broccoli in the house, but I didn't just want to make grilled chicken with air-fried broccoli on the side. That's boring! So I googled, "easy recipe with chicken and broccoli" and found this one from Christine Pittman's Cook the Story blog. It was simple and yummy!
Ingredients
8 skinless chicken thighs
1/2 tsp. salt
1/4 tsp. black pepper
1/2 tsp. dried thyme
1.5 pound head of broccoli
1/2 cup panko breadcrumbs
1 cup shredded cheddar cheese
2 Tbsp. olive oil
Directions
Preheat oven to 350°F.
Lightly oil a large skillet or rimmed baking dish. Arrange the chicken thighs in the skillet in a single layer.
Sprinkle with salt, pepper, and thyme.
Break the florets off of the broccoli. If you’d like, peel and chop the stalks to include them, too. Arrange broccoli around chicken pieces.
In a medium bowl toss together the bread crumbs, cheese, olive oil, 1/4 teaspoon salt, and 1/4 teaspoon coarse pepper.
Arrange bread crumb mixture over the broccoli in the pan. It’s ok if some gets on the chicken, but concentrate on the broccoli.
Bake until chicken is cooked through to 165°F on an instant-read thermometer, so about 40-50 minutes.
I'm not sure if I didn't use the right size pan, or my ratio between chicken and broccoli was off, but I had SO much of the bread crumb/cheese mixture that there's no way I could have only put it on the broccoli. I covered the whole dish with it (who doesn't like more cheese?). I baked the dish for 40 minutes, but I left it in the oven for another 5 minutes to allow some browning of the cheese (plus, that gave me time to microwave a baked potato for the side dish). This was definitely a quick dinner to throw together, and while it's cooking, that time can be spent enjoying a happy hour drink beforehand at home. I'll be sure to make this recipe again!
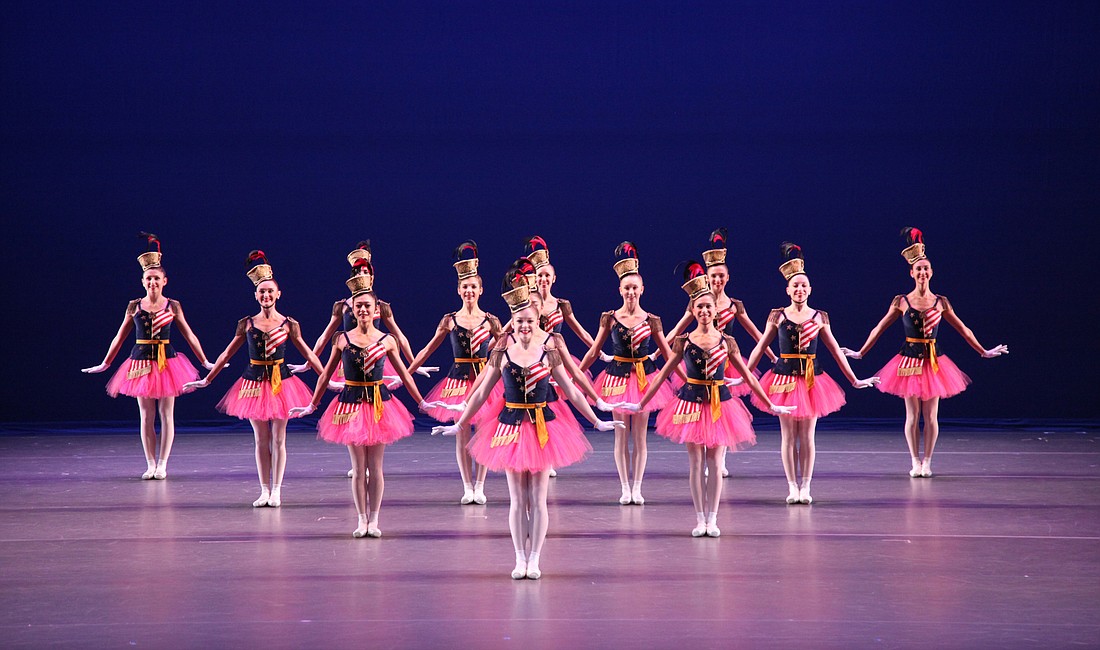
Over the weekend, my friend and I went to see the Sarasota Ballet's "Life & Liberty" program. We went out to dinner at Lucile Pizza and Wine Bar and got to the Sarasota Opera House about an hour early. We had a glass of wine out in the courtyard, lingering and chatting, and about 15 minutes before the start of the show, I suggested we go inside and find our seats. When we went to an usher, she informed us we were at the wrong venue! We were supposed to the be at the Van Wezel Performing Arts Hall! Luckily the two spots are very close to each other, so we sped over there, and with the help of valet parking, we made it to our seats just in time. Whew!
This piece was choreographed by the famous George Balanchine, and it first premiered in 1958. I thought the costumes were a bit gimmicky and too "on the nose" (pink tutus with flag-inspired tops is a bit too literal). But I did appreciate when the dancers marching on pointe. That is not easy! The piece was only about 30 minutes long, so it flew by, especially for the first "act" of a performance!
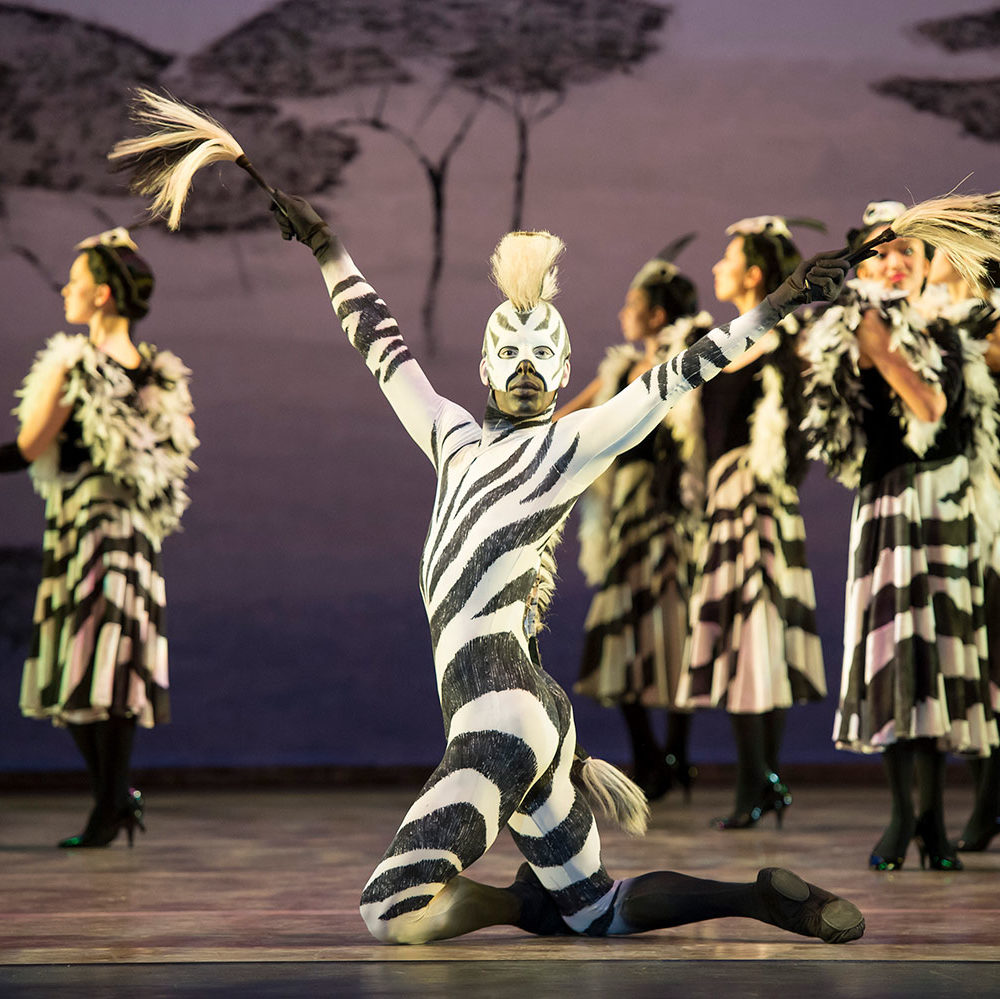
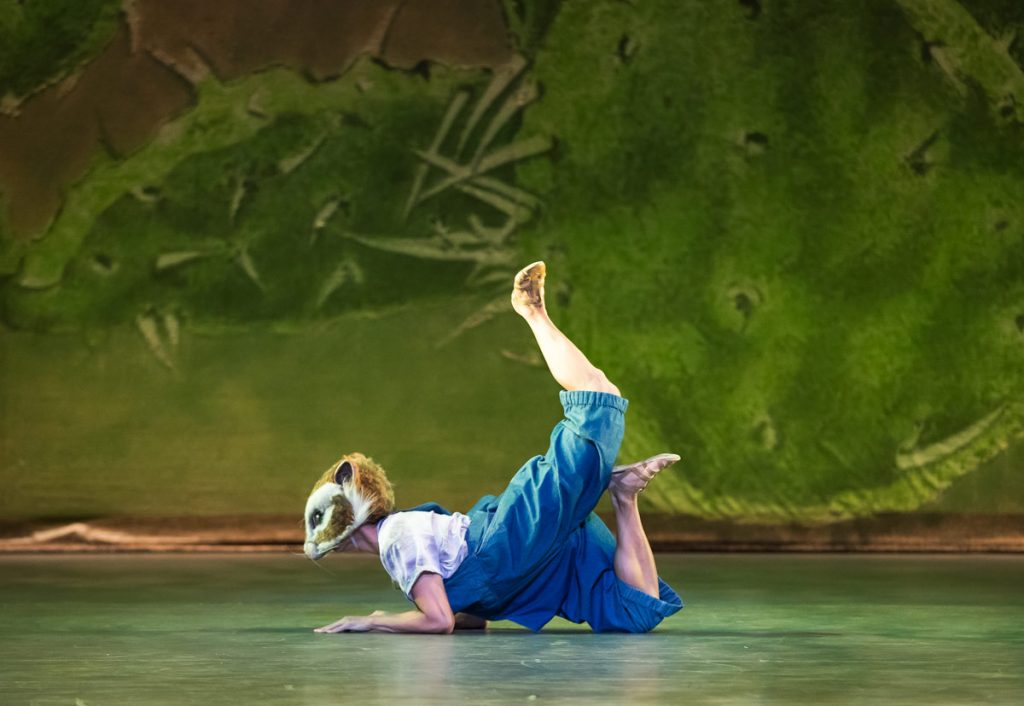
I was very interested in seeing this piece. Since the Sarasota Ballet is housed in the same building where I work, I had seen posters of dancers dressed as animals (the zebra costume is quite striking), and I had to know what it was all about!
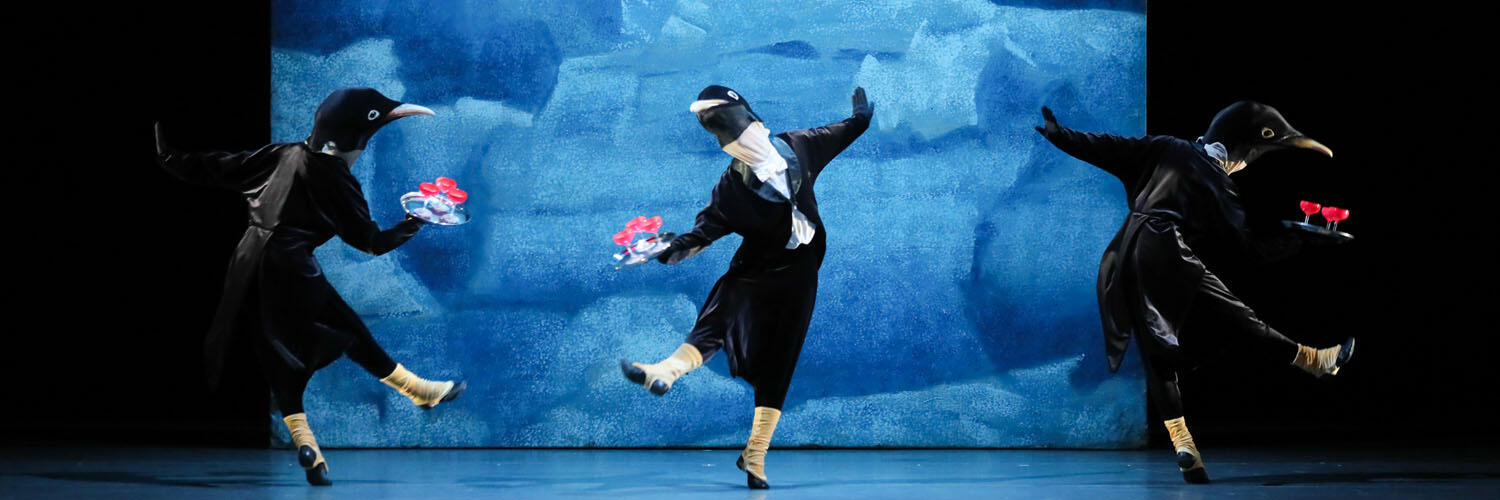
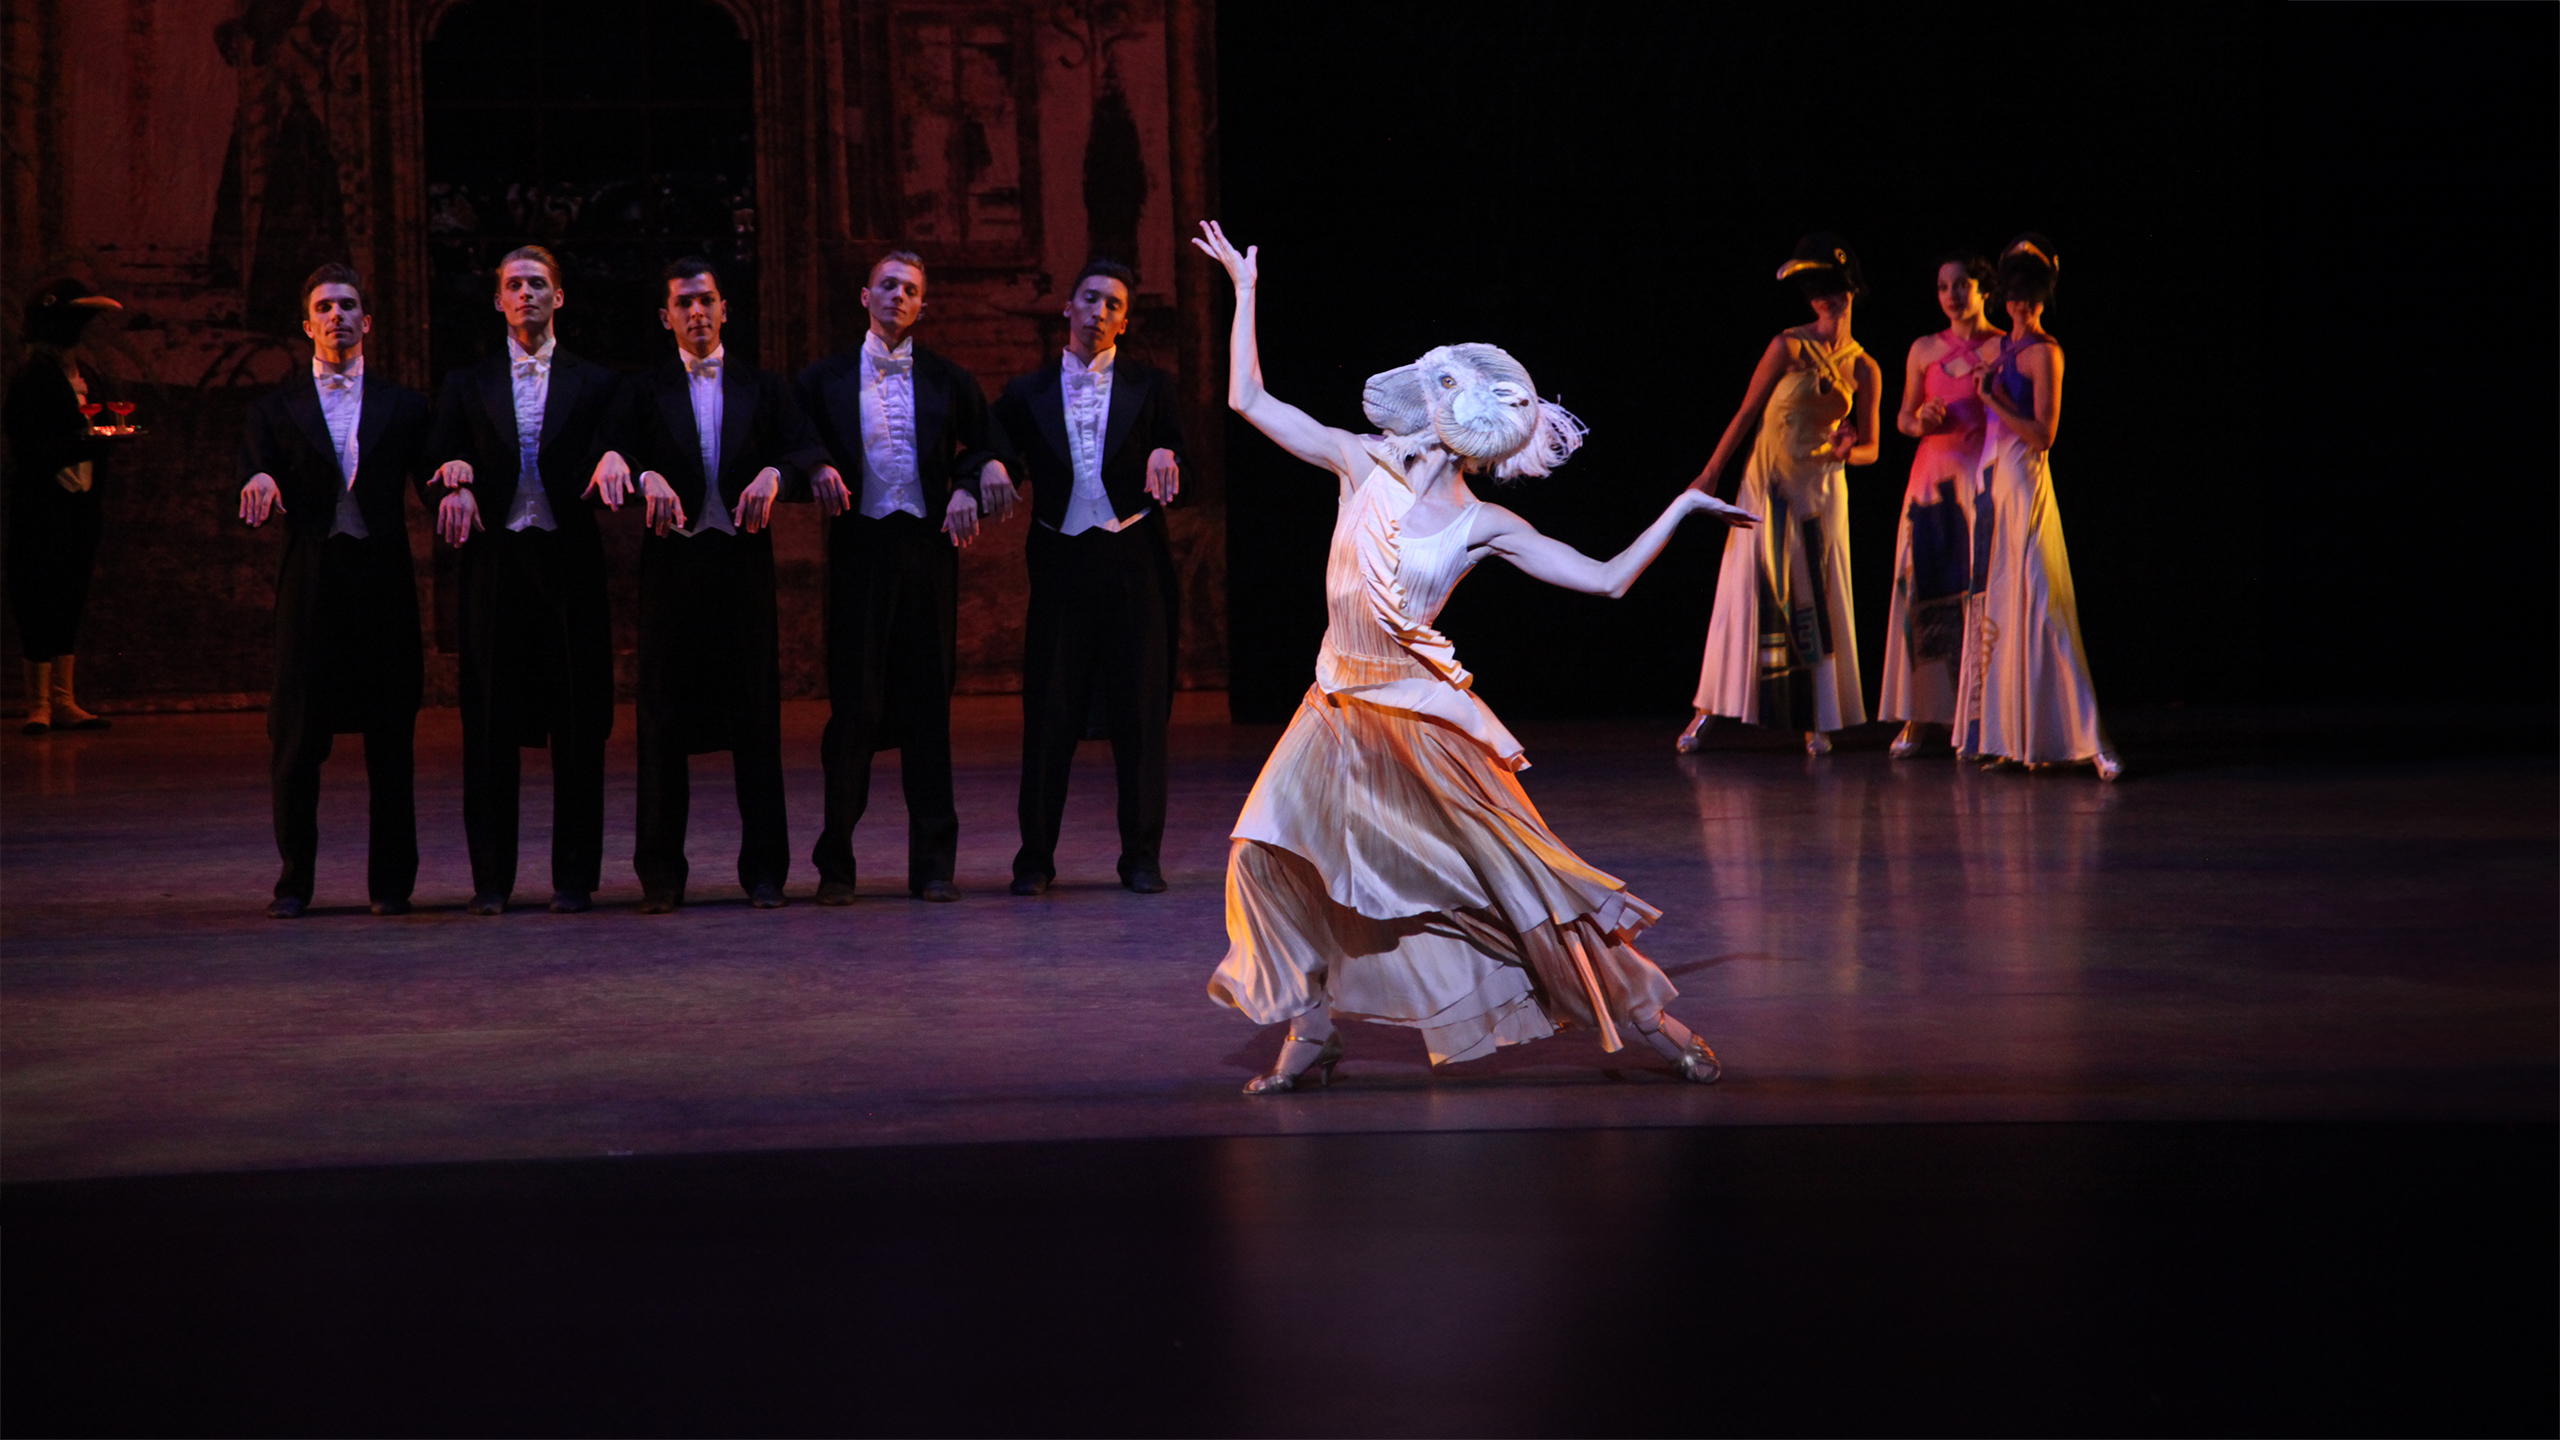
Sir David Bintley choreographed this piece, which debuted in 1988 (thirty years after the other one!). This piece is meant to reflect upon species extinction and conservation, which I think comes off very clearly. It is certainly not a traditional ballet when very few (if any?) of the dancers were on pointe. This was mostly modern dance, which I normally don't care for, but this creation is so unique!
The dancing starts with a cocktail party with penguin servers (so cute, especially when they hopped around!), which flowed into a ram (but female?) dancing with men in tuxes.
Then we transitioned to the desert featuring the Texas Kangaroo Rat. This part was the most like modern dance (i.e. lots of laying on the floor), but it was very fun.
Toward the end of this part, the kangaroo rat began to itch; the rat exited the stage, the backdrop looked like hair, and fleas came onto the stage. So now we're on the back of the rat! I liked how maracas were used to mimic the feel of itching.
After that, the Zebra came in, and he was joined by several women dressed in black and white dresses. At one point the Zebra was shot, and the sound was so jarring! (Later on in the show, there were more shots, but they were represented by bright jolts of light, which I liked better.)
The next segment was called "now nothing" and portrayed a native family of a father, mother, and child wandering in the darkness. This shows what the world would be like if all of nature were destroyed. I was surprised to see human representation (thinking all the costumes would revolve around animals), and even more surprised that the sheer bodysuits left little to the imagination (cue the nipples). This was a bit distracting and detracting, but I understand the messaging that came behind it.
In the end, the animals were walking into the darkness two by two. I thought the nod to Noah's ark was pretty obvious, so when the backdrop BECAME the ark and you could see the animals in it, I thought the literal presentation took away from the artistry a bit.
BUT my friend and I really liked this one, I think because it is so different from any other dance piece we've ever seen! Bravo!
Here's a video of this one, too:
If I learned another dance company was performing "Penguin Cafe," I would definitely go to see it!
I wanted to bake something for book club this week, and since one of our members is vegan, I always like to make something she can eat. I found this recipe on the Three Little Chickpeas blog, and since I love peanut butter desserts, I thought this was worth trying.
Ingredients
½ cup (120 g) unsweetened natural peanut butter (with salt) (measure after stirring)
¾ cup (130 g) granulated sugar
½ cup (125 ml) dairy-free milk
1 teaspoon vanilla extract
1 ½ cups (180 g) whole-wheat flour, spooned and leveled
½ cup (90 g) vegan chocolate chips
2 tablespoons (13 g) ground flax seed
1 ½ teaspoons baking powder
Pinch of salt (if your peanut butter doesn't contain salt use ¼ teaspoon)
Directions
Preheat oven to 350 F (180 C).
Line an 8x8 inch glass baking dish with parchment paper.
Mix together the peanut butter and sugar with the back of a fork until the sugar is mixed into the peanut butter.
Then to peanut butter mixture, whisk in the dairy-free milk and vanilla extract until smooth (a balloon whisk works well here). Make sure there are no large clumps, a few tiny lumps are fine.
In a large bowl whisk together the whole-wheat flour, chocolate chips, ground flaxseed, baking powder, and salt.
Add the wet ingredients to the flour mixture and mix together with a rubber or silicone spatula. The dough will be thick.
Press the cookie dough into the glass baking dish and spread it out to the corners. Use a silicone spatula to help spread the dough out (Use damp hands to pat down and smooth out the top).
Bake for 16-18 minutes. To test lightly press the top of the cookie dough (careful it's hot), if your fingerprint stays, cook for another 1-2 minutes. The top should look set, puffed up, and spring back slightly when touched.
The cookie bars need to cool completely to set, if you cut the bars while they're too warm they'll crumble. I let them cool for around 15 minutes in the dish, then lift them out with the sides of the parchment paper to a cooling rack to cool completely.
Store in the refrigerator and they'll firm up more once chilled.
As usual, I didn't stick to the ingredient list as written. I didn't bother trying to find vegan chocolate chips, so I just went without (same with the flaxseed). I used regular flour, and my non-dairy milk of choice was plain soy milk.
At first mixing the peanut butter and sugar was a little tricky, but eventually the peanut butter did absorb all the sugar. And it wasn't too hard making sure the wet mixture wasn't clumpy. I appreciated the tips about using a fork for mixing and damp hands for pressing the dough into the pan. Speaking of which, I don't have a glass square pan, so I used a metal one; when making this switch, you always want to shorten the bake time (I did 12 minutes and maybe could have gone a minute or two longer).
I think I've made both better peanut butter desserts and vegan desserts before, but this one isn't bad. These bars are quite dense and rich, so a small square is plenty! These probably would be better with the chocolate chips to add a little change in the texture. I'll remember that if I make them again!
As usual, when I have some overripe bananas, I choose to make banana bread. I hadn't made a chocolate one in a long time (I have made many different kinds of banana breads*), so I thought I'd try that. I found this recipe on the Baking with Dan blog, and I was ready to go!
Ingredients
1 cup all purpose flour
¾ cup brown sugar, lightly packed
⅓ cup dutch process cocoa powder
1 teaspoon baking powder
½ teaspoon fine salt
¼ teaspoon baking soda
1 cup mashed very ripe bananas, about 2.5 medium bananas
½ cup plus 1 Tablespoon vegetable oil
2 large eggs
1 teaspoon vanilla extract
½ cup chocolate chunks or chips
Directions
Preheat your oven to 350 degrees F. Spray an 8"x4" loaf pan and line with parchment paper.
In a medium mixing bowl add the flour, light brown sugar, cocoa, baking powder, salt and baking soda. Whisk to combine and set aside.
In a blender or the bowl of your food processor, add the mashed bananas, oil, eggs and vanilla extract. Blend on high for 15 seconds to emulsify the liquid ingredients. Pour the liquid ingredients into the dry ingredients and stir until combined. Fold in the chocolate chunks and then pour the batter into the prepared pan. Top with more chocolate chunks if desired (I always do!) Bake in the center of your oven for 60-70 minutes until a toothpick inserted in the center comes out with a few moist crumbs. Check earlier if using a larger loaf pan. Allow to cool in the pan for 20 minutes and then remove and place on a cooling rack to cool completely.
Some of the steps in this recipe are a little much. Do you have to spray the pan AND use parchment paper? I did because Dan said to, but I think either one on its own would work fine. And I was not about to break out a blender or mixer to make banana bread. Just mix it by hand with a spatula! I don't think everything needs to be "emulsified" to make good banana bread (I like the bigger banana chunks!), and that extra step adds more items to clean anyway. I also blended the dry ingredients into the wet instead of the other way around, since that's how most baking recipes work.
I didn't have too many chocolate chips left in my pantry, so I just sprinkled everything I had on top, like a chocolate shell. Yum! I would definitely make this one again!
*Here are some blog posts of other banana breads I have made (determined by flavor or supplies):
Over the holidays, I got to see not one but TWO ballet performances. How awesome is that!
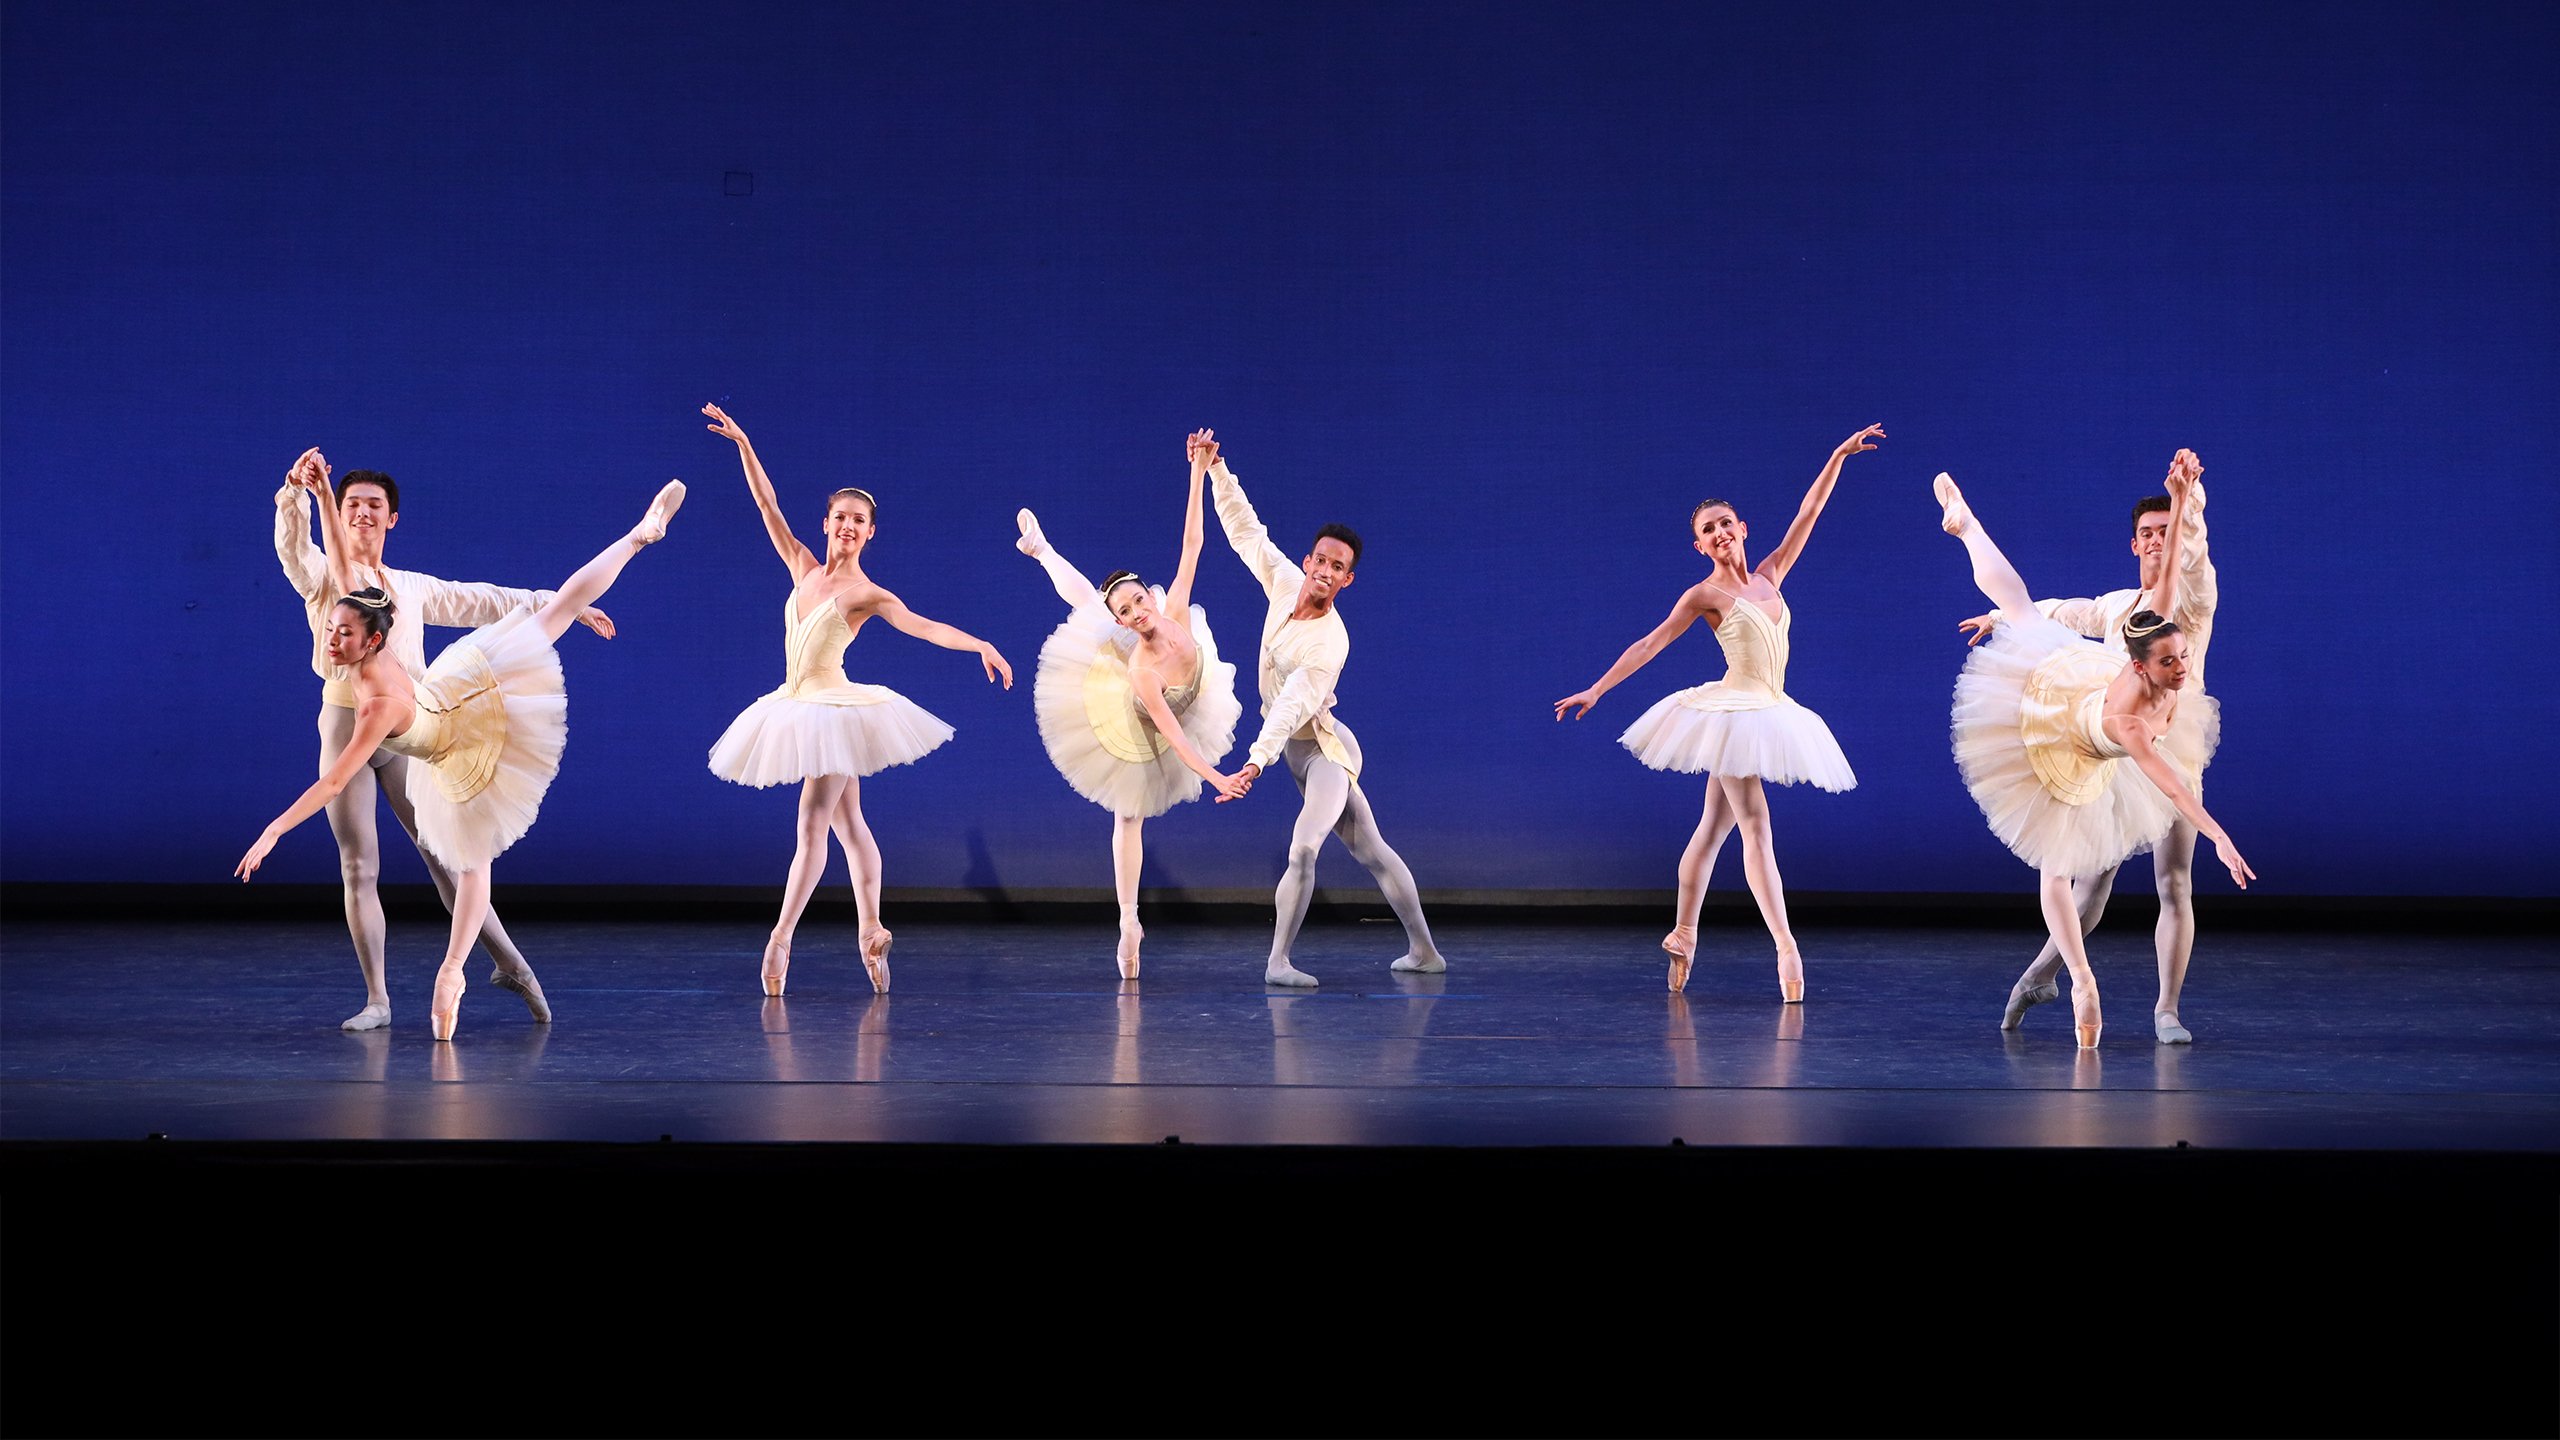
The first one was when my friend and I saw the Sarasota Ballet and their "Masters of Movement" performance at the Sarasota Opera House. This was the second show of our subscription, and we both agreed we liked it better than the first one we saw. The "Masters of Movement" performance was a nice mix of class ballet and modern dance (and I usually don't care for the latter).
This first piece was choreographed by George Balanchine, a legend in the ballet world, and set to music by Mozart. It premiered in New York City in 1956, so it's been around for a long time. I totally forgot that I had seen the piece years ago at the Kennedy Center, that time performed by the New York City Ballet (read that blog post here). There is no story or plot, but rather is just meant to appreciate the "elegant and inventiveness" that is "playful, refined, and surprising" (notes from the program). I tried to watch it just to appreciate the movement of dance and the inherent fun in dancing. I really liked it!
While the video below features the Suzanne Farrell Ballet, you can get a taste of the piece:
Mozartiana
The second piece was also choreographed by Balanchine, and while the dancing is set to Tchaikovsky's Suite No. 4, that music is actually the Russian's orchestration of works by Mozart (so I guess kind of like a medley or remix?). This was also a classic piece, and the Sarasota Ballet's version featured some child dancers, too. This one felt a little less fun than the previous, but still just as beautiful.
This video was filmed in 1983 soon after Balanchine's death (he choreographed the piece in the early 80's just a few years before he died). But this is the full thing, so you can really appreciate it.
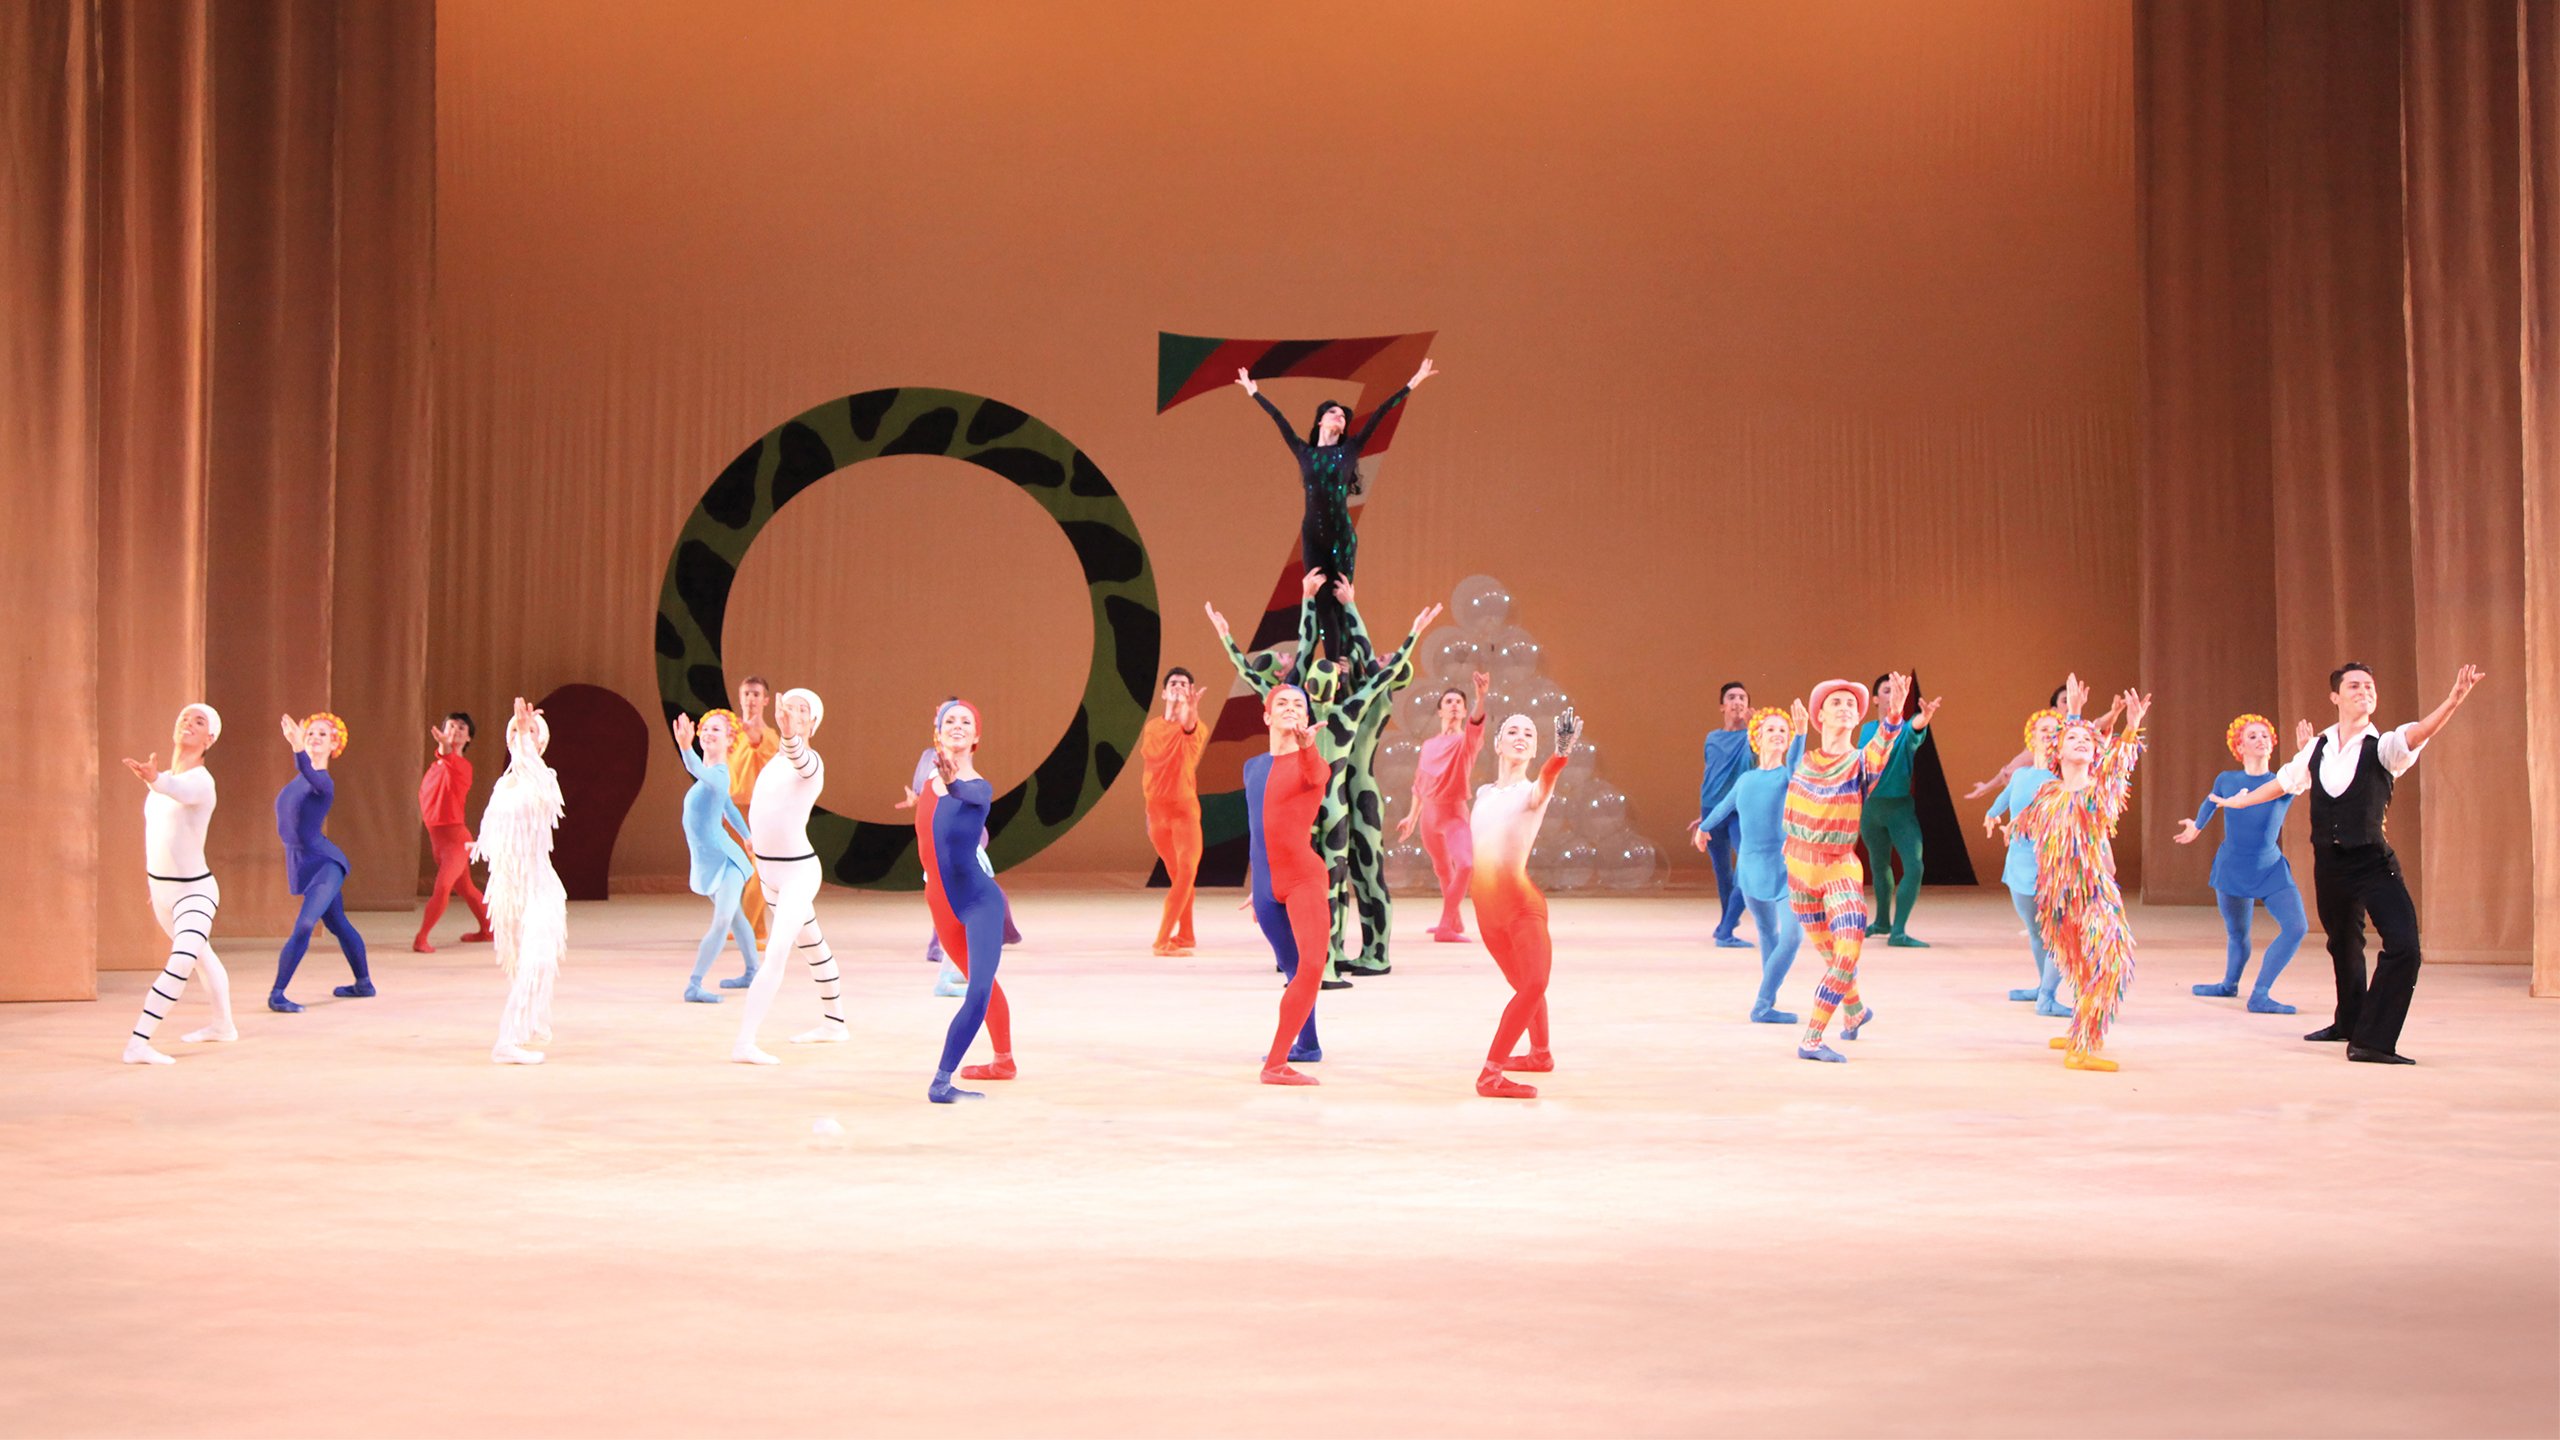
Even though this was the modern dance piece, my friend and I liked it the best! It was so fun, so creative, and just very different! Sir Frank Ashton choreographed the piece in the late 1960's and based it on the nursery rhyme, "Monday's Child," creating a dance for each day of the week set to jazz music from the era. I had actually seen the Friday dance at the Sarasota Ballet's gala last year, but I didn't know that at the time! So it was cool seeing it again along with all the other "days." The music, written by Sir Richard Rodney Bennett, is so lively, and each part was exciting with all the colorful costumes. It kind of reminded me of the "sweets" featured in the Nutcracker: each one is unique but just as fun as the others.
Here is a preview video from the Sarasota Ballet so you can see the awesome costumes and some of the artwork/structures that went along with the dancing:
What a great show! The next performance from our subscription isn't until March, so I'm glad I got to see another ballet show so soon. Just a few days later, my mom and I saw the Sarasota Ballet School perform The Nutcracker (I LOVE the Nutcracker and had not seen it the past two years, so I was really looking forward to it, especially because I got to see it with my mom!).
There were 130 students (!) in the production from multiple studios, and we were so impressed! Their ages ranged from teeny tiny girls, maybe four years old, to the Sugar Plum Fairy (played by Kerry Shannon, a new member of the Sarasota Ballet Studio Company, and she was SO good!), who is probably in her early 20's. Because there were so many dancers, they had to get creative with the roles. For example, the Arabian Coffee dance (what they called the "desert dance" for some odd reason) featured three boys and three girls (six dancers total), when usually that piece is performed by only women or is featured as a pas de deux. But it's so nice that all the students could be included.
Along with Shannon, we also thought Violet Olson, who played Clara, and Gregory Dempsey, who played the Nutcracker prince (Nathaniel?) did a great job as well. It was nice that, because they are both teenagers, they seem age-appropriate as a couple, as opposed to the traditional Nutcracker in which Clara, a young girl, is with a grown man prince.
Here's a little video from a few years ago. These kids are really talented!
And you can check out this article in The Sun about this year's production, too!


